
Welcome back! Hopefully by now you've read the introductory post to this series. If not: Howdy! We're walking through how to design a keyboard using the Ergogen ergonomic keyboard layout generator. In Part 1 of this guide we'll be defining some useful units for our keyboard and creating the points that comprise it's layout.
If you haven't already, navigate to ergogen.xyz and clear out the contents of the left side of the page. Go ahead and open up a text editor on your system and create a backup your-keyboard-name.yaml file. Each code block in this guide will iterate on the previous block. Feel free to follow along on ergogen.xyz. I'll post the current full Ergogen config file at the end of each part of this series.
Update: Ceoloide's done an incredible job of updating the web based version of Ergogen. It now features the ability to import external footprints, KiCAD previews, Github integration, and more. Previous versions of this guide referenced the ergogen.ceoloide.com version of the site, but all of his changes have been rolled back into the official ergogen.xyz site.
Set Up Your Units
Before we get into the config file proper, we should set up some useful variables. Ergogen uses the metric system and any number without a unit behind it is understood to be in millimeters. padding: 4 describes a key with 4mm of padding for example. (The one large exception to this is rotation properties, where numbers without units are describing degrees of rotation.)
There's a few magic numbers that are repeated frequently when designing a keyboard. Cherry MX keys are 19mm x 19mm, and Kailh Choc keys are 18mm wide and 17mm tall. There's nothing stopping you from using spread: 19mm throughout your config file, but Ergogen provides us with a few useful default units to reference these frequently used numbers. The lowercase u unit provides you a quick reference to the MX switch's 19mm, while a capital U represents 19.05mm for keycaps that need a bit more breathing room. Over on the Kailh side of things, Choc keys have cx and cy to quickly reference the 18mm width and 17mm height of these rectangular keys.
These units can be mixed with common math operations. spread: u defines a spread with a standard MX spacing, spread: 1.5u defines a spread of one and a half MX keys, and spread: u + 2 defines a standard MX spread with an extra 2mm of space.
u, U, cx, and cy come built into Ergogen by default, but we're not limited to just these units. The units: section at the top of your config allows you to create your own custom variables. Let's go ahead and create a units: section now and set up some proxy units.
units:
  # Proxy Spacing Variables
  kx: cx
  ky: cy
  # Padding Variables
  px: kx + 2
  py: ky + 2
Ergogen's built in units are great, but they're a pain to update if you realize you want to globally adjust some aspect of your board. If you'd like to take an MX spaced layout to a Choc spaced layout, you can't just find-replace the u character throughout your project. You can save your future self some trouble by creating a pair of "proxy" kx and ky variables pointing to whatever Ergogen default you'd like to leverage. We're designing a Choc spaced board today, so let's define our proxy variables to kx: cx and ky: cy. In the future if we want to adjust this board to an MX layout, all we need to do is update these variables to kx: u and ky: u.
We'll show off the power of units a bit later in this guide. While we're here though, let's go ahead and define some slightly padded values of our standard width and height. px: kx + 2 (20mm) and py: ky + 2 (19mm) will help us down the road when we're trying to come up with the outline for our PCB.
Get To The Point
Ergogen uses the concept of "Points" to describe where each key in a layout should be placed. A single "Point" describe the [x,y] coordinate at the center of where a key should be placed, as well as an r value describing that key's rotation. A group of points in Ergogen is known as a Zone.
The vast majority of ergonomic keyboards, including the one we're going to build today, leverage a "keyboard matrix". This is a set of rows and columns that allow us to use a dozen pins on our keyboard to read dozens of keys. In keyboard matrix parlance (and uh, general table nomenclature), the up-down groups of keys are a "column", and the left-right groups of keys are a "row".
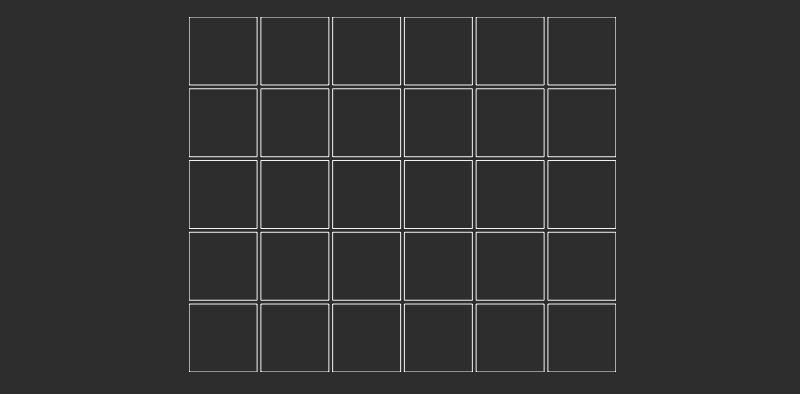
Let's go ahead and define a few basic rows and columns now. The keyboard we want to build is a knockoff of the Sofle keyboard. It has four complete rows with six keys, a smaller modifier row with four keys, and a thumb. Setting aside the thumb key for the moment, let's build a simple 5 row by 6 column design to start with.
units:
  # Proxy Spacing Variables
  kx: cx
  ky: cy
  # Padding Variables
  px: kx + 2
  py: ky + 2
points:
  zones:
    matrix:
      columns:
        outer:
        pinky:
        ring:
        middle:
        index:
        inner:
      rows:
        mod:
        bottom:
        home:
        top:
        num:
This is about a simple a layout one can get in Ergogen, but let's break down exactly what just happened. The points: section indicates that we're defining the layout of the keyboard itself. The zones: section allows us to define several different "groups" of keys. These can be named anything you'd like. I've gone with matrix in this example since we're defining a keyboard matrix, but you could just as easily name it mykeyboard or steve. An Ergogen keyboard can have multiple zones. We've defined the basic keyboard matrix for now, but we'll come back and add a thumb zone later.
Inside of our matrix:, I've defined column: and row: sections. These are fixed names in Ergogen, and let our config file know how many up-down and left-right key groups we'd like.
The names of the rows and columns themselves aren't fixed. You're often see pinky, ring, middle, index, and inner in community Ergogen configs, but everyone's has their own preferences. I've called the column with my tab key the outer column, but just as often you'll find folks calling it pinky2, stretch, or something similar. Likewise, mod, bottom, home, top, and num are popular row terms, but you can define them as anything you'd like.
Let's create a completely different set of points just to drive this all home.

points:
  zones:
    da_board:
      columns:
        foo:
        bar:
        florp:
        pings:
      rows:
        tom:
        dick:
        harry:
If you're scouring the Ergogen documentation for some property that everyone seems to be using which you can't seem to find the definition of, it's probably a user-definable property name. It may take some time for you to get a feeling for what's a strict name and what's just a community convention.
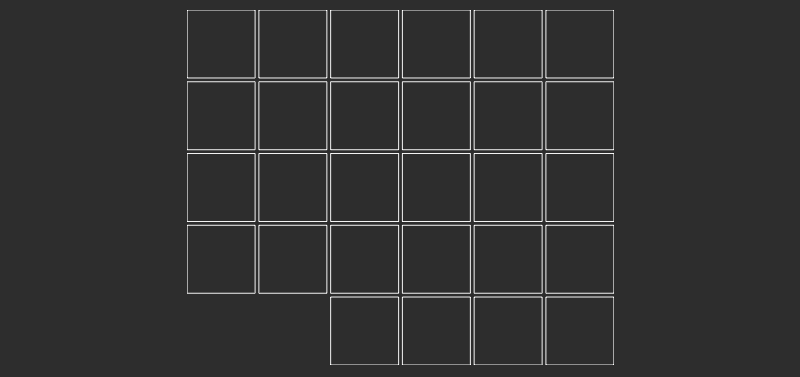
Back to our original board definition, our matrix currently has a few too many keys. This 5x6 grid is perfectly symmetrical, but we don't want any keys underneath the Left Shift and Z keys. Let's rectify that now.
points:
  zones:
    matrix:
      columns:
        outer:
          rows:
            mod:
              skip: true
        pinky:
          rows.mod.skip: true
        ring:
        middle:
        index:
        inner:
      rows:
        mod:
        bottom:
        home:
        top:
        num:
There we go! We're still missing a thumb, but our weird ergonomic keyboard is starting to take shape. As you can see I- Wait, what the heck? I used two completely different methods of hiding those keys!
We're adding our first real property to this board and I'm already introducing some YAML shortcuts. As you can see with the outer: column, we've added a new rows: attribute. This tells the config, "Hey, I'm going to start defining properties pertaining to the intersection of the outer column and a specific row." Nesting mod: underneath rows: lets Ergogen know we're specifically targeting the key at the overlap of the outer column and the mod row. Finally we can get to the actual property at hand. skip: true lets Ergogen know that we'd like to skip adding an outer-mod key to our layout.
This one property takes up a decent amount of space in our config. We had to nest skip: true inside of mod: inside of rows:. Rather than having to type all that out and make an increasingly nested file, we can leverage YAML's dot notation. In the pinky: column, you can see that we simply use rows.mod.skip: true to achieve the same effect as all those indented attributes. You don't need to use dot notation if you prefer indentations, but it's important to know that folks didn't suddenly decide to use reallyLongVariableNames if you're reading other people's Ergogen configs.
We still need to add a thumb to our keyboard, but it's also looking rather square compared to the original Sofle. The Sofle keyboard has this neat "curl" effect where the keys in each column are slightly staggered to accommodate the shape of one's hand. Let's add a column stagger now.
points:
  zones:
    matrix:
      columns:
        outer:
          rows.mod.skip: true
        pinky:
          rows.mod.skip: true
        ring:
          key:
            stagger: 5
        middle:
        index:
        inner:
      rows:
        mod:
        bottom:
        home:
        top:
        num:
Our man's moving up in the world! And by "our man", I mean the ring column is shifted up 5mm. Remember, anything without units in Ergogen is understood to be millimeters.
You can use units in these properties as well. Let's send the middle column for a ride.
points:
  zones:
    matrix:
      columns:
        outer:
          rows.mod.skip: true
        pinky:
          rows.mod.skip: true
        ring:
          key:
            stagger: 5
        middle:
          key:
            stagger: 2ky
        index:
        inner:
      rows:
        mod:
        bottom:
        home:
        top:
        num:
Dang! Adding key.stagger: 2ky moved the middle column up two whole Choc key heights over the ring column. It's important to note that the stagger property is in relation to the column before it. middle is 2ky taller than our ring column, but our ring column was already 5mm taller than our pinky column. This means that middle is 2ky + 5mm taller than our pinky column. You can also see that index and inner are both in line with middle's last position. The index and inner columns are assumed to have a stagger of 0 right now, so they simply continue from middle's starting position.
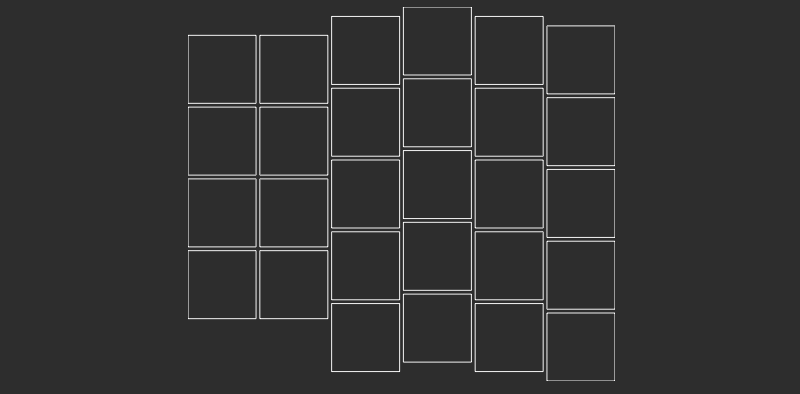
Now that we've had our fun, let's create a slightly more reasonable layout.
points:
  zones:
    matrix:
      columns:
        outer:
          rows.mod.skip: true
        pinky:
          rows.mod.skip: true
        ring:
          key:
            stagger: 5
        middle:
          key:
            stagger: 2.5
        index:
          key:
            stagger: -2.5
        inner:
          key:
            stagger: -2.5
      rows:
        mod:
        bottom:
        home:
        top:
        num:
There's our familiar Sofle shape! (I just eyeballed these stagger values based off the existing Sofle keyboard PCBs.) It's worth noting that most properties in Ergogen accept negative values. You may have noticed all these stagger properties are inside of key: attributes. We could collapse these with the same dot notation as before, but our config's still pretty readable at the moment. Now then, before we get to the thumb keys, let's do a little bit of housekeeping.
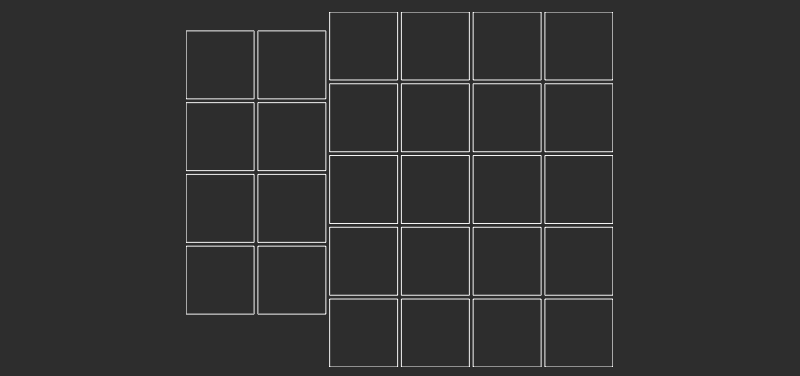
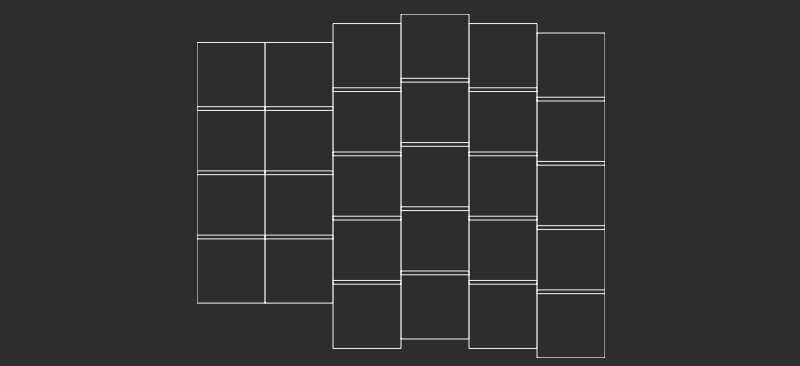
Choc Spacing
Our board is going to leverage those Kailh Choc switches we mentioned in the units section. Ergogen defaults to using 19mm x 19mm MX switches by default, so we need to add a small change to our config in order to space our keys out correctly.
points:
  zones:
    matrix:
      key:
        padding: 1ky
        spread: 1kx
      columns:
      	...
      rows:
      	...
Tada! Our board looks... weird and cramped. In this step, we went ahead and added a new global key definition to our matrix zone. padding: 1ky defines the vertical space between each key, and spread: 1kx defines the horizontal space between each key. We set up these proxy units as copies of the Choc key sizes, so these attributes give each space 17mm of vertical space, and 18mm of horizontal space.
So why are the top and bottom edges overlapping, and the left and right edges are literally on top of each other? Unfortunately, ergogen.xyz only renders MX-sized 19mm x 19mm key switch as part of its demo.dxf preview. Things might look a little cramped at the moment, but we'll be able to verify our spacing during some of the later steps.
Update! Part 2 of this guide teaches you how to create custom outlines that let you better preview Choc-spaced keys. However, ergogen.xyz now supports custom preview variables! You can set$default_widthand$default_heightin theunits:section to adjust thedemo.dxfpreview. These variables only adjust the web preview, so the rest of what I previewed in Part 2 is still useful!
Just a quick aside, Ergogen v3 lacked the global key: definition within a zone. The spread: property needed to be applied manually to every column. Just something to keep in mind when browsing old configs.
Splayed Out
The Sofle keyboard we're mimicking sticks to a traditional column stagger. For example's sake however, let's take a look at the popular splay: property.
points:
  zones:
    matrix:
      key: ...
      columns:
        outer:
          rows.mod.skip: true
        pinky:
          key:
            splay: -4
          rows.mod.skip: true
        ring:
          key:
            stagger: 5
        middle:
          key:
            stagger: 2.5
        index:
          key:
            stagger: -2.5
        inner:
          key:
            stagger: -2.5
      rows: ...
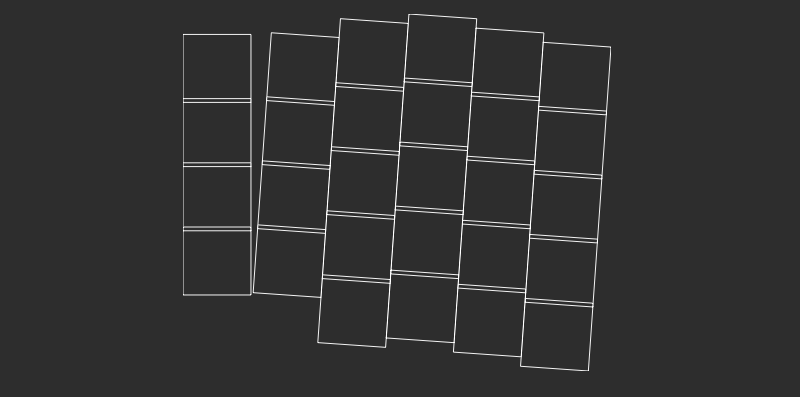
Splay allows you to angle an entire row of keys. In this case, we used key.splay: -4 inside of the pinky: column to angle it four degrees to the right. Again, you can use positive or negative degrees here. This property is traditionally used when angling pinky keys out to the side of the keyboard. Much like stagger, columns next to a splayed column will continue to be aligned to that angle.
points:
  zones:
    matrix:
      key: ...
      columns:
        outer:
          key:
            splay: 8
          rows.mod.skip: true
        pinky:
          key:
            splay: -4
          rows.mod.skip: true
        ring:
          key:
            splay: -4
            stagger: 5
        middle:
          key:
            stagger: 2.5
        index:
          key:
            stagger: -2.5
        inner:
          key:
            stagger: -2.5
      rows: ...
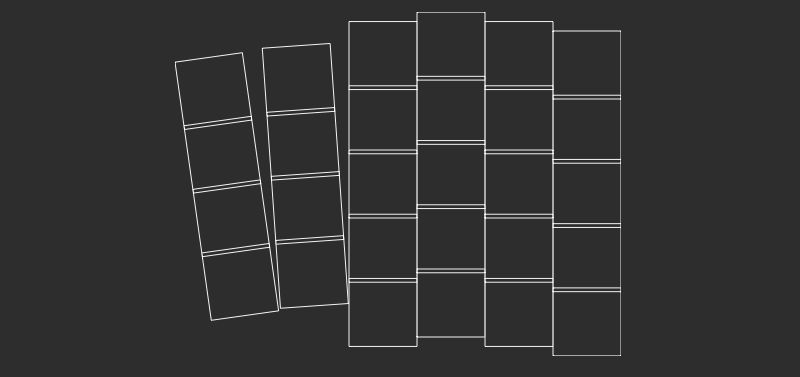
Ergogen makes it nice and easy to achive splayed out pinky nirvana.
points:
  zones:
    matrix:
      key: ...
      columns:
        outer:
          key:
            splay: 8
          rows.mod.skip: true
        pinky:
          key:
            splay: -4
          rows.mod.skip: true
        ring:
          key:
            splay: -4
            stagger: 5
        middle:
          key:
            stagger: 2.5
        index:
          key:
            stagger: -2.5
        inner:
          key:
            rotate: -4
            stagger: -2.5
      rows: ...
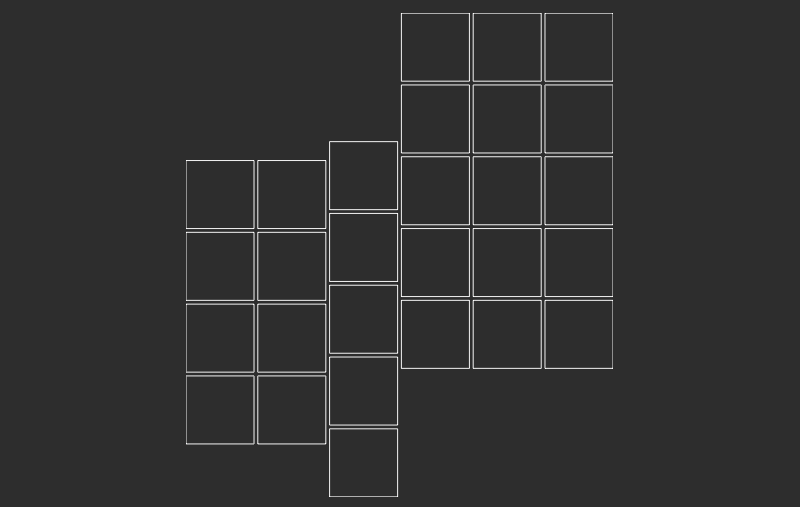
Another v3 to v4 migration note worth calling attention to is that v3's rotate property was renamed to splay. v4 has it's own new rotate property which works slightly differently. In Ergogen v4, splay rotates a column as a single group, and rotate curves the keys out in a fan like approach. You can see it in the inner.key.rotate: -4 section of this latest example.
Now that we've given a quick demonstration of splay, let's get back to our Sofle-inspired design. Once you've deleted the splay and rotate examples, we can finally tackle the thumbs.
Thumbs Up
Ergonomic mechanical keyboards will often include a section known as a "thumb cluster" or a "thumb fan". The Sofle layout doesn't have a significant cluster of keys around the user's thumb, but the layer key and the spacebar key do have a slight curve to them. In this section we'll be defining and aligning this new thumb cluster, but first a bit of house keeping.
points:
  zones:
    matrix:
      key:
        padding: 1ky
        spread: 1kx
      columns:
        outer:
          rows.mod.skip: true
        pinky:
          rows.mod.skip: true
        ring:
          key.stagger: 5
        middle:
          key.stagger: 2.5
        index:
          key.stagger: -2.5
        inner:
          rows.mod.skip: true
          key.stagger: -2.5
      rows:
        mod:
        bottom:
        home:
        top:
        num:
To start with, let's hide the inner column's mod key. This will give us room to place our curved thumb keys.
This config file's getting a little long now, so may haven noticed ... in the code blocks a few times now. That's just shorthand for collapsing something we covered in an earlier section. (The line numbering may get a little wonky, try not to worry about it too much.)
points:
  zones:
    matrix:
      key: ...
      columns:
        outer: ...
        pinky: ...
        ring: ...
        middle: ...
        index: ...
        inner: ..
      rows:
        mod:
        bottom:
        home:
        top:
        num:
    thumbs:
      key:
        padding: 1ky
        spread: 1kx
      columns:
        layer:
        space:
      rows:
        cluster:
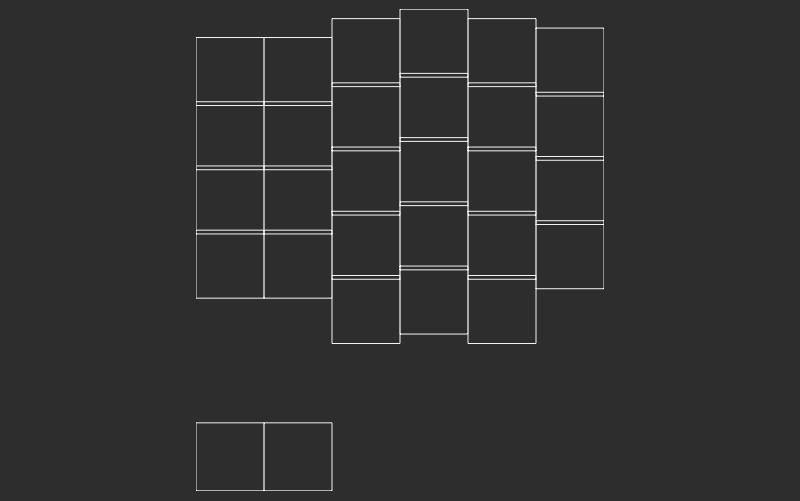
Now this is interesting. I've gone ahead and defined a second zone of keys. thumbs: is another user-definable name. This is a particular small two-by-one group of keys. I've gone ahead and called the columns space and layer, and given the row a name of cluster. Technically with a one row layout like this you can omit the rows section entirely if you want to make your config a smaller. I've also added a key section with the same Choc spacing defaults.
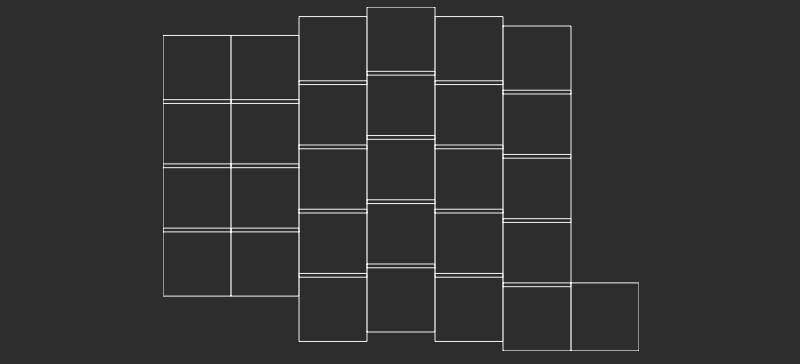
I never told Ergogen where to put these keys, so it just defaulted to inserting them into the first free space it could find at the bottom left of the layout. It's a little hard to see which two keys are part of our cluster. Let's move them around for a better view.
points:
  zones:
    matrix:
      key: ...
      columns:
        outer: ...
        pinky: ...
        ring: ...
        middle: ...
        index: ...
        inner: ...
      rows:
        mod:
        bottom:
        home:
        top:
        num:
    thumbs:
      key:
        padding: 1ky
        spread: 1kx
      columns:
        layer:
        space:
      rows:
        cluster:
          shift: [0, -2ky]
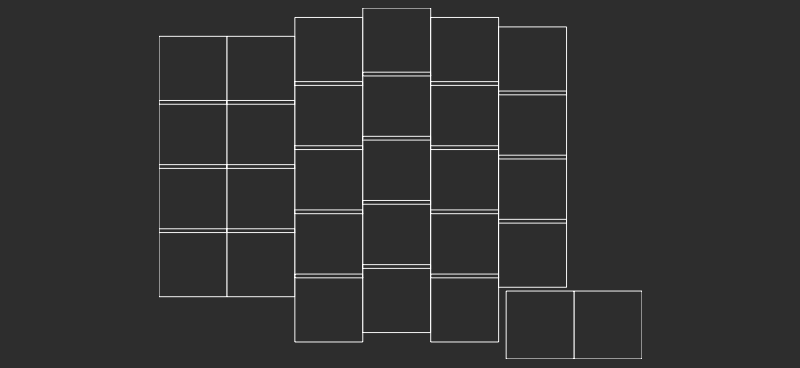
Ergogen provides us some convenient methods for shifting keys around. In this most recent example, I moved the entire row two whole key heights lower than its default position. Now we can more easily see the thumb zone that we just defined. If we wanted to get it over towards the thumb area I could just use shift: [5kx,0] to move it over five key lengths, but Ergogen provides a better method of placing keys.
points:
  zones:
    matrix:
      key: ...
      columns:
        outer: ...
        pinky: ...
        ring: ...
        middle: ...
        index: ...
        inner: ...
      rows:
        mod:
        bottom:
        home:
        top:
        num:
    thumbs:
      key:
        padding: 1ky
        spread: 1kx
      anchor:
        ref: matrix_inner_mod
        shift: [2, -2]
      columns:
        layer:
        space:
      rows:
        cluster:
Here's a new property and a new syntax. The anchor property tells Ergogen where the starting point for this zone should be. ref: is pretty straightforward. It's a reference of where the anchor should be placed. matrix_inner_mod is something we haven't seen yet though. This is Ergogen's way of referencing a specific point (AKA a key) on our keyboard. The first part refers to the key's zone (matrix in this case), then the next part of the variable is the key's column, and finally the last section is the row. Keep in mind all three of these variables are user-definable, so if you see some underscore-separated variables in other people's configs with terms that you don't recognize, it's because they chose those names for their specific config. In this example, we've placed the anchor position for the thumb keys where our hidden matrix_inner_mod key would have gone.
points:
  zones:
    matrix:
      key: ...
      columns: ...
      rows: ...
    thumbs:
      key:
        padding: 1ky
        spread: 1kx
      anchor:
        ref: matrix_inner_mod
        shift: [2, -2]
      columns:
        layer:
        space:
      rows:
        cluster:
Let's give our thumbs a bit of breathing room for the next step. Ergogen properties can be used throughout your config where they makes sense. In this case, let's shift our anchor over 2mm and down 2mm.
points:
  zones:
    matrix:
      key: ...
      columns: ...
      rows: ...
    thumbs:
      key:
        padding: 1ky
        spread: 1kx
      anchor:
        ref: matrix_inner_mod
        shift: [2, -2]
      columns:
        layer:
          key:
            splay: -15
        space:
      rows:
        cluster:
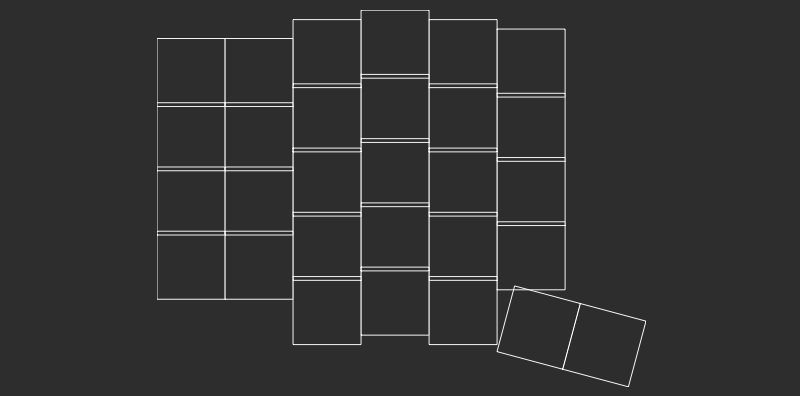
Here we've added a -15 degree splay to our layer key. The space key continues off this new rotated position.
points:
  zones:
    matrix:
      key: ...
      columns: ...
      rows: ...
    thumbs:
      key:
        padding: 1ky
        spread: 1kx
      anchor:
        ref: matrix_inner_mod
        shift: [2, -2]
      columns:
        layer:
          key:
            splay: -15
        space:
          key:
            splay: -15
      rows:
        cluster:
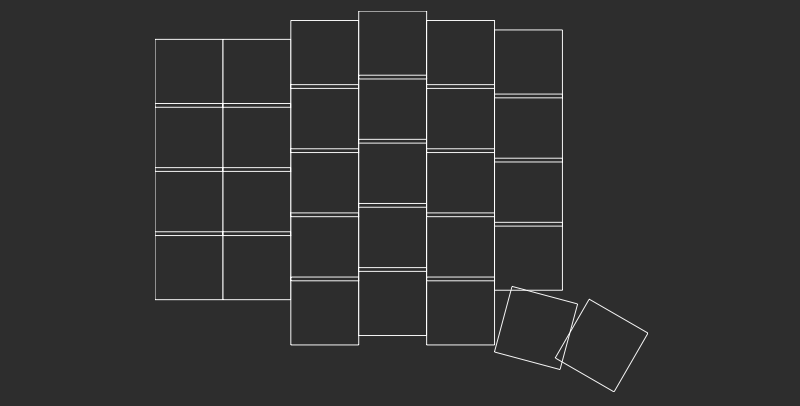
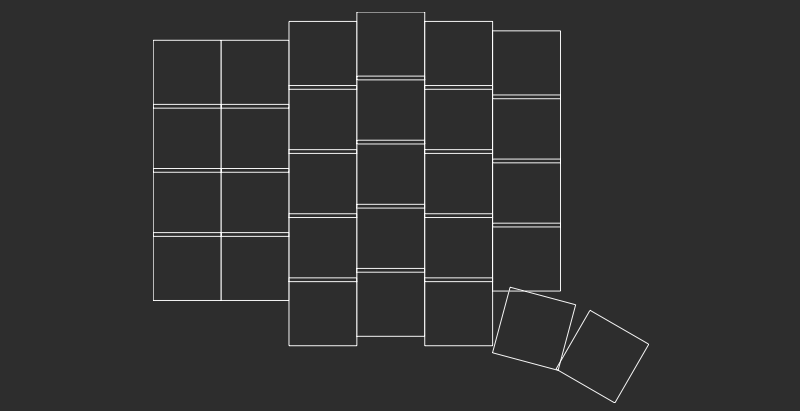
This time we'll also add a -15 degree splay to the space key. It's looking good, but it's not quite aligned yet. There's a lot of overlap between these two keys.
points:
  zones:
    matrix:
      key: ...
      columns: ...
      rows: ...
    thumbs:
      key:
        padding: 1ky
        spread: 1kx
      anchor:
        ref: matrix_inner_mod
        shift: [2, -2]
      columns:
        layer:
          key:
            splay: -15
        space:
          key:
            splay: -15
            shift: [2,-2]
      rows:
        cluster:
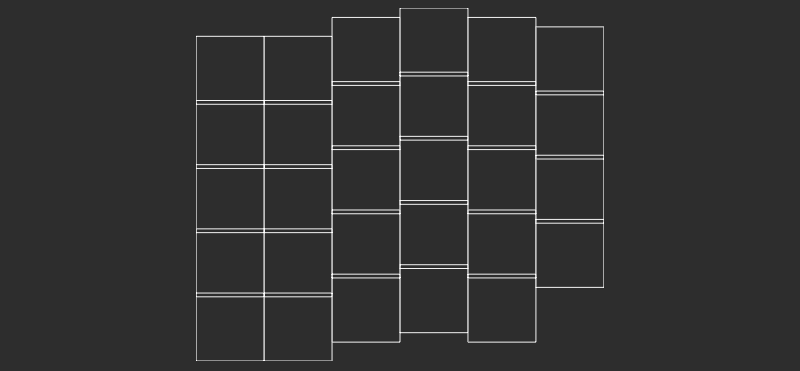
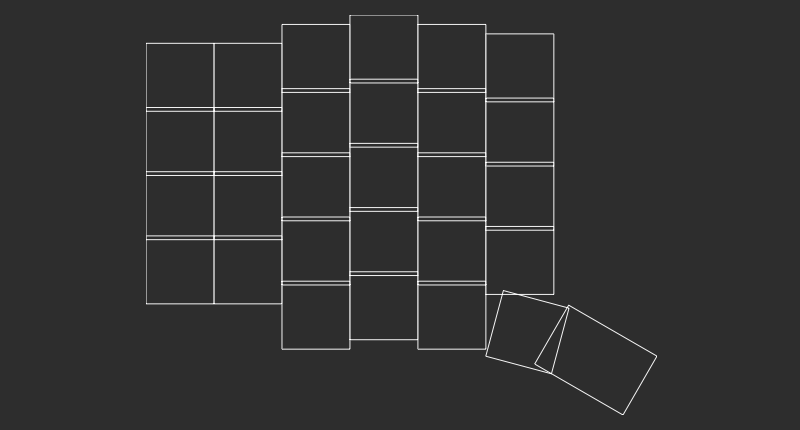
There we have it! We'll need to double check when we have a true Choc layout preview later, but this seems like a pretty good first draft. All the shift column needed was a quick shift: [2, -2] to shift the key over 2mm and down 2mm. We're just about there, but our spacebar doesn't look quite right just yet. The Sofle uses a 1.5 width key for the spacebars. Thankfully Ergogen has just such the property for us.
points:
  zones:
    matrix:
      key: ...
      columns: ...
      rows: ...
    thumbs:
      key:
        padding: 1ky
        spread: 1kx
      anchor:
        ref: matrix_inner_mod
        shift: [2, -2]
      columns:
        layer:
          key:
            splay: -15
        space:
          key:
          	width: 1.5kx
            splay: -15
            shift: [2,-2]
      rows:
        cluster:
Whoops. We've got 1.5 wide keycaps, but we need a 1.5 tall keycap here. It turns out the nice thing about working with rectangular components is that you can rotate them pretty easily. -15 degrees + 90 degrees is 75 degrees. Let's update that splay now.
units:
  kx: cx
  ky: cy
  px: kx + 2
  py: ky + 2
points:
  zones:
    matrix:
      key:
        padding: 1ky
        spread: 1kx
      columns:
        outer:
          rows.mod.skip: true
        pinky:
          rows.mod.skip: true
        ring:
          key.stagger: 5
        middle:
          key.stagger: 2.5
        index:
          key.stagger: -2.5
        inner:
          rows.mod.skip: true
          key.stagger: -2.5
      rows:
        mod:
        bottom:
        home:
        top:
        num:
    thumbs:
      key:
        padding: 1ky
        spread: 1kx
      anchor:
        ref: matrix_inner_mod
        shift: [2, -2]
      columns:
        layer:
          key.splay: -15
        space:
          key:
            width: 1.5kx
            splay: 75
            shift: [2,-2]
      rows:
        cluster:
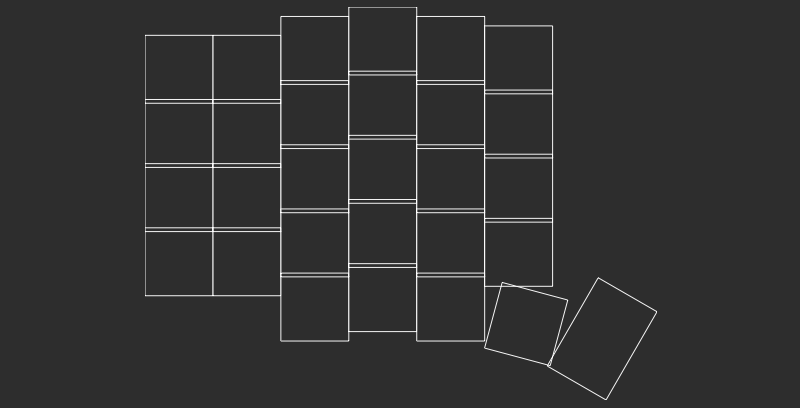
There's our completed layout! We've gone from zero to ergonomic keyboard keyboard in under 50 lines of text. Of course, this is just one half of the keyboard. We still need to figure out where we're going to go from here.
To Split or Not To Split?
Split keyboards are popular in the ergonomic keyboard space. Since they're two separate pieces, you can pull them apart and place them wherever makes the most sense on your desk. There's a bit more complexity involved however. You need to bridge the two halves of the keyboard with a headphone-style TRRS jack or incorporate wireless capabilities into your design. Additionally, many split designs also rely on a "reversible" PCB design. This lets you use the same circuit board for both the left and right half of the keyboard, but introduces some complexity into routing all the traces on the board.
For simplicity's sake, I'm going to stick with a single piece unibody design for this keyboard. Each half of the keyboard be a part of the same PCB, with the microcontroller resting in the middle. This will make the rest of the examples a bit easier to follow, but that means we only have a single half of our keyboard at the moment. Let's rectify that.
points:
  zones:
    matrix:
      key: ...
      columns: ...
      rows: ...
    thumbs:
      key: ...
      anchor: ...
      columns:
        layer: ...
        space: ...
      rows:
        cluster: ...
  mirror: &mirror
    ref: matrix_inner_num
    distance: 2.5kx
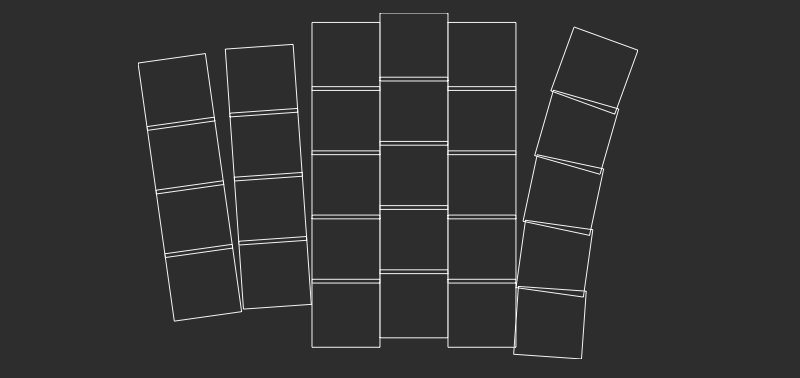
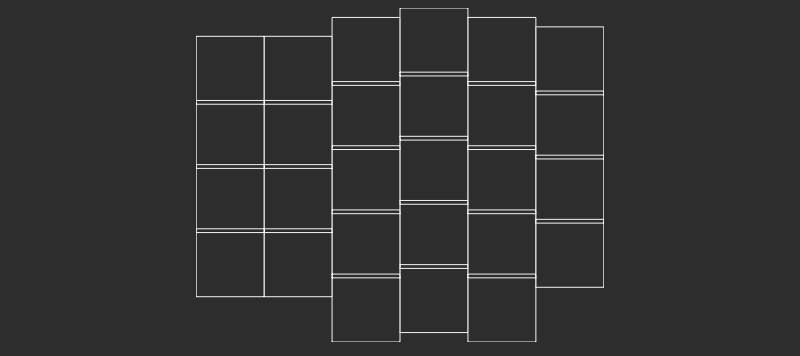
Mirror mirror on the config, who's the fairest of them all? Adding a mirror section immediately creates a flipped copy of your board. The ref and distance properties are used for placement. In this case, the two matrix_inner_num keys are 2.5 key widths apart. Everything's looking good so far, but let's see if we can make the board a bit more ergonomic. That is ostensibly why we're here after all.
points:
  zones:
    matrix:
      key: ...
      columns: ...
      rows: ...
    thumbs:
      key: ...
      anchor: ...
      columns:
        layer: ...
        space: ...
      rows:
        cluster: ...
  rotate: -15
  mirror: &mirror
    ref: matrix_inner_num
    distance: 2.5kx
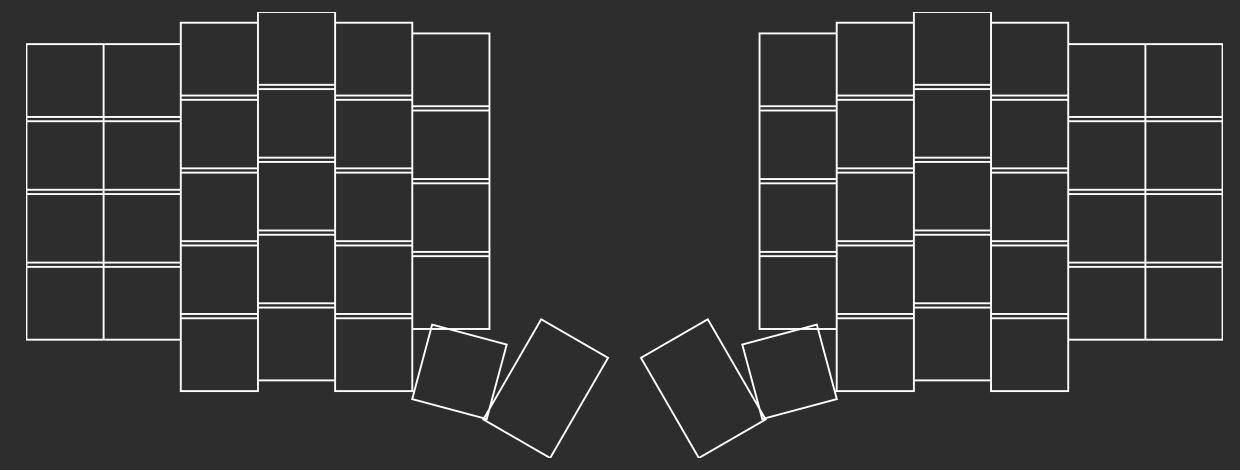
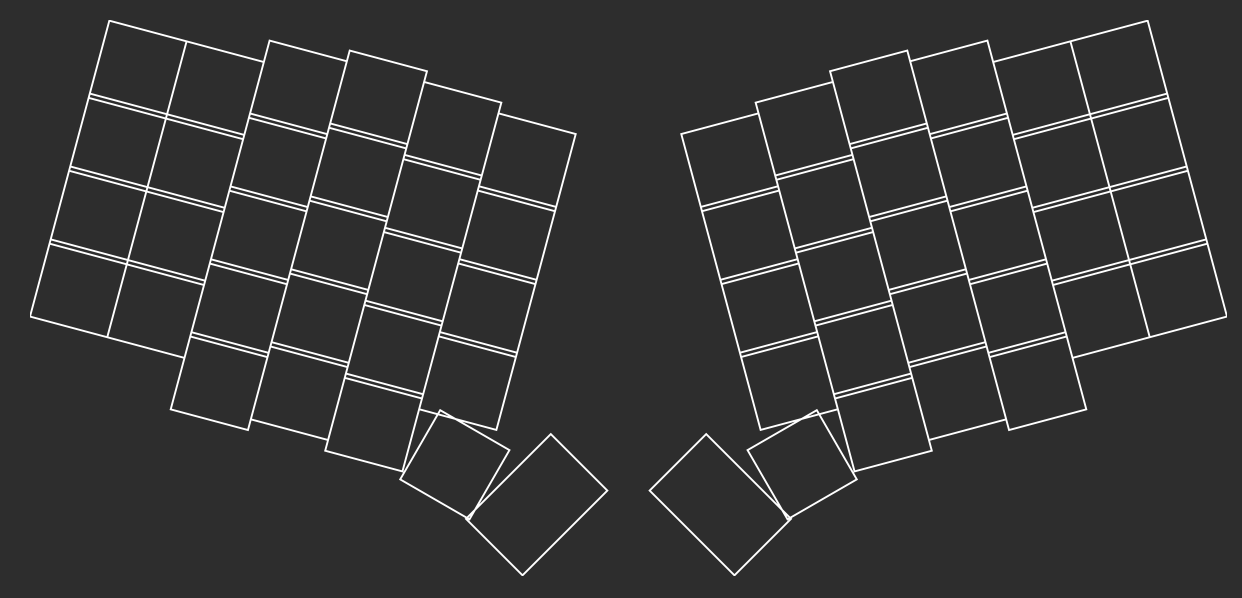
Adding rotate: -15 into our points section rotates our entire keyboard by -15 degrees. Since we've mirrored the keyboard, the other side has been rotated 15 degrees to match.
End of Part 1
units:
  # Proxy Spacing Variables
  kx: cx
  ky: cy
  # Padding Variables
  px: kx + 2
  py: ky + 2
points:
  zones:
    # The primary 6x4 key matrix, plus 3 modifiers.
    matrix:
      # Choc spacing
      key:
        padding: 1ky
        spread: 1kx
      columns:
        # Hide the first two mods and the last mod.
        # Provide a Sofle-like column stagger.
        outer:
          rows.mod.skip: true
        pinky:
          rows.mod.skip: true
        ring:
          key.stagger: 5
        middle:
          key.stagger: 2.5
        index:
          key.stagger: -2.5
        inner:
          rows.mod.skip: true
          key.stagger: -2.5
      rows:
        # Four main rows, one partial row.
        mod:
        bottom:
        home:
        top:
        num:
    # Thumb cluster for Layer and Space keys.
    thumbs:
      # Choc spacing
      key:
        padding: 1ky
        spread: 1kx
      # Place thumbs where the inner mod would go.
      anchor:
        ref: matrix_inner_mod
        shift: [2, -2]
      columns:
        # Fan thumbs out by -15 degrees.
        layer:
          key.splay: -15
        # Spacebar uses a 1.5 wide key.
        space:
          key:
            width: 1.5kx
            splay: 75
            shift: [2,-2]
      rows:
        # Thumbs only have one row.
        cluster:
  # Mirror keyboard halves with a moderate rotation.
  rotate: -15
  mirror: &mirror
    ref: matrix_inner_num
    distance: 2.5kx
That does it for Part 1 of this guide! You can see now how powerful Ergogen can be for rapidly iterating on custom keyboard designs. Adding or subtracting rows is as easy as tweaking a line of text, and unit variables provide us with a flexible design we can redefine over time.
Now that we've got the basic layout defined, stay tuned for: Let's Design A Keyboard With Ergogen v4: Outlines (Part 2).