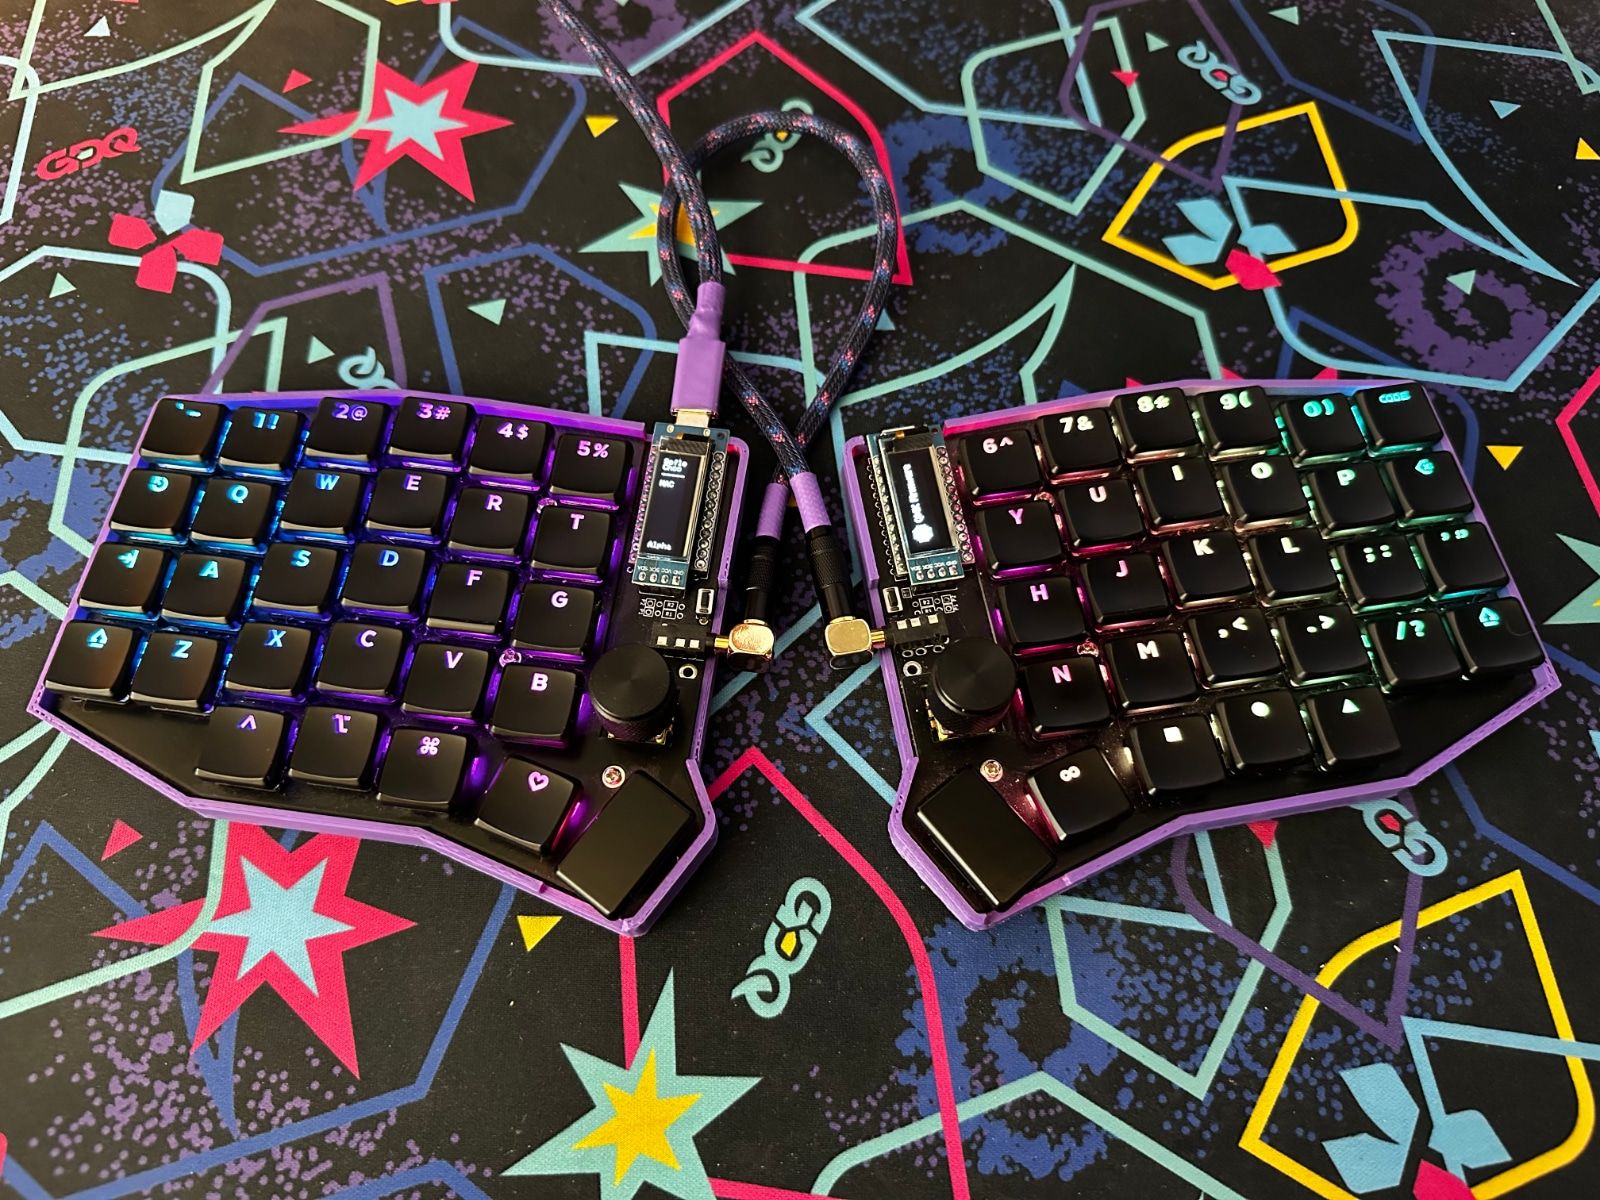
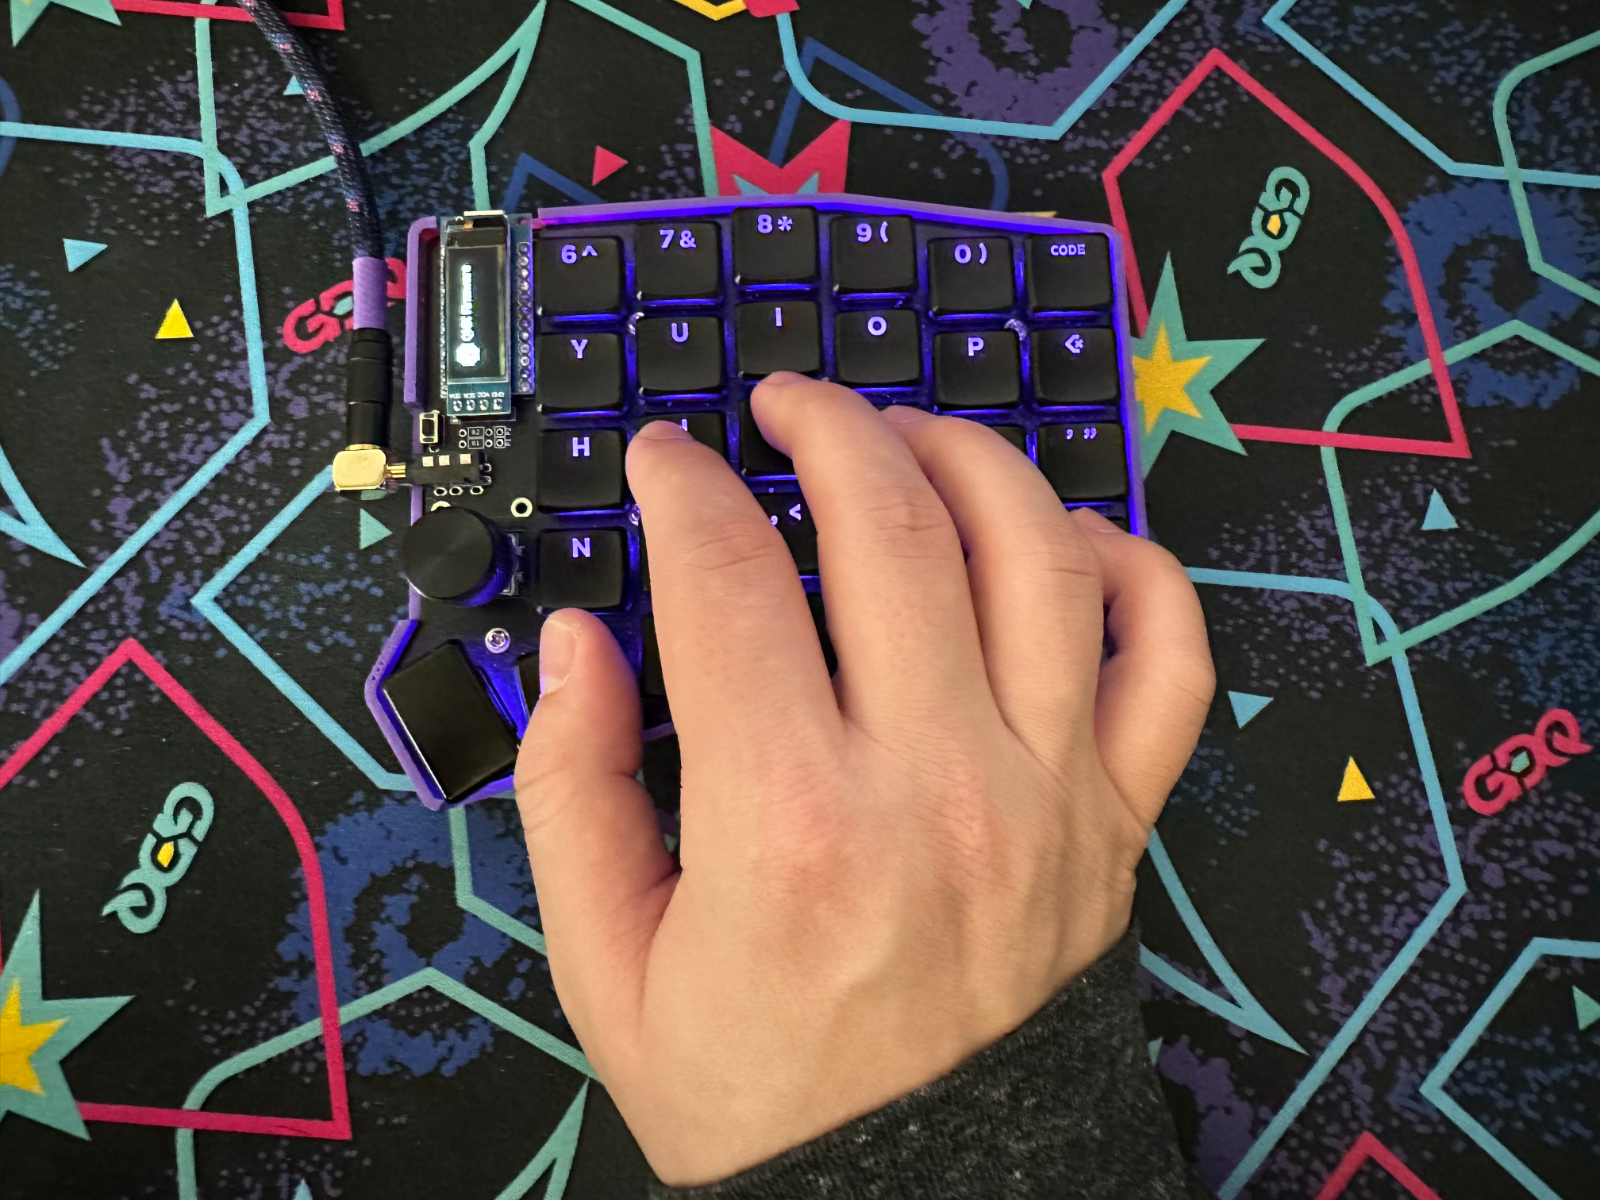
Say hello to the Sofle Choc. This is Brian Low's low profile variant of Josef Adamčík's Sofle split mechanical keyboard. It features Kailh Choc switches, a staggered column layout, and QMK support. If it’s not already clear, I’ve officially fallen off the deep end of custom keyboards, and I’m dragging you along for the ride.
Mechanical keyboards are having a bit of a moment. There’s always been a passionate undercurrent of techy individuals with strong opinions on the input devices they use daily, but the internet’s finally done its thing and brought these people together. Communities like Reddit’s /r/mechanicalkeyboards and /r/ErgoMechKeyboards/ are more than happy to help ratchet up your level of keyboard nerdery, and there’s dozens of niche Discords for enthusiasts to discuss their latest builds. Even mainstream companies like Logitech and Razer have started to offer up their own takes the latest mechanical keyboard trends for the clacky curious who aren’t looking to lose afternoons to wiki pages and sticky posts.
So, how did we get here? More importantly, where did all my keys go?
The Basics
The subject of mechanical keyboard switches has been detailed extensively, so I’ll try to keep this brief. [Editor's Note: Whoops.] If you haven’t sought out an expensive aftermarket keyboard, you’re most likely typing on your laptop keyboard or whatever came with your last desktop computer in 2006.
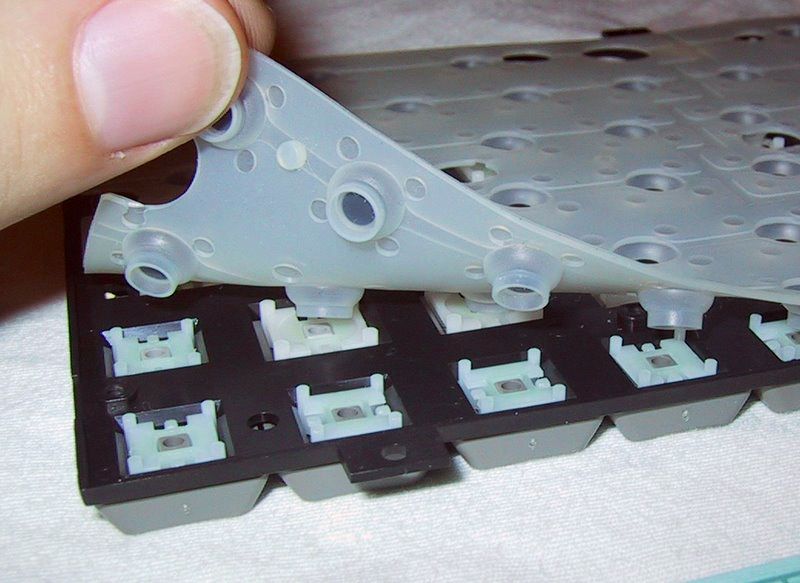
Cheap keyboard typically use what’s known as "membrane" or “rubber dome” switches. The keyboard’s manufacturer prints a circuit board with dozens of contact pads on it, and then stretches out a thin piece of conductive rubber on top. When you push down on the plastic key cap, it squishes the rubber against the circuit board, the circuit is closed, and the signal is sent. It’s a cheap and effective way to build a keyboard, but it often feels “mushy”. It’s not clear when the rubber is actually going to make contact, and it can take a while for things to bounce back.
On the laptop side of things, manufactures employ rather impressive “scissor switches” to build absurdly thin portable keyboards. They’re a marvel of modern industrial design, but they also are generally lacking in the physical feedback department. They key has such little distance between its resting state and its fully pushed position that it can be difficult to tell when a key has been let go and is ready to type again.
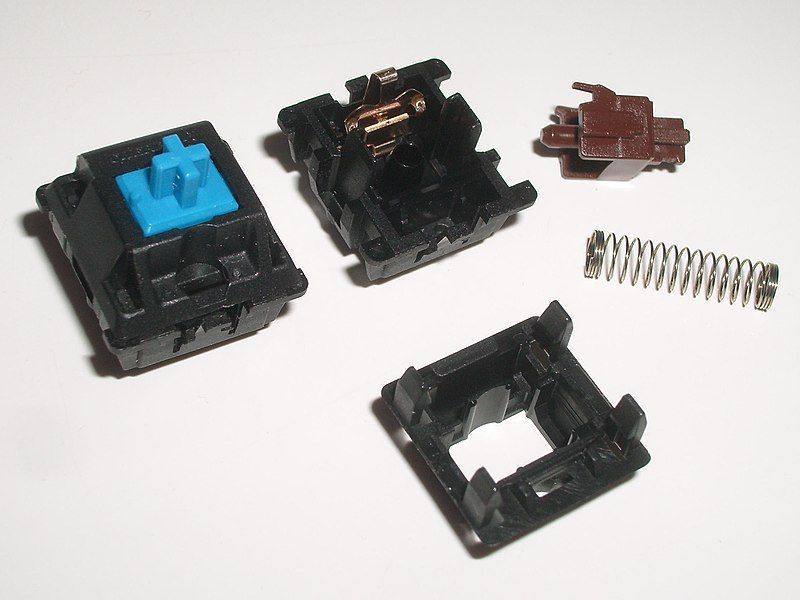
Mechanical keyboard switches eschew these cost cutting and miniaturization trends. They take inspiration from the keyboard designs of the early decades of computing and rely on discrete, chunky components. Each key has its own physical switch sporting a large spring mechanism and a noticeable amount of key travel.
The vast majority of mechanical keyboard switches mimic or outright clone the Cherry corporation’s perennial "MX" switch. These keyboard switches are now sold by dozens of manufacturers in a bewildering array of varieties, and choosing the right one for you can be a little intimidating for newcomers.
Mechanical keyboards are perhaps most famous for their “clicky” style key switches. These switches produce an audible "Click!" sound and send a small vibration through the key when the switch has been pushed enough to send its command. Interestingly, mechanical key switches don't require that you push the key down all of the way. Switches only require you push them down about half of their height before the command is actually sent. Once you hear the click, you know you can let go and get ready to press the key again. (Of course, there's nothing stopping you from pushing the key down fully if you'd like.) The immediate physical and audio feedback of clicky MX switches makes them particularly popular with PC gamers.
They are a little difficult to use in close proximity with other human beings however. It's hard to overstate just how loud a clicky keyboard can be once you get deep into a typing session. Most software development teams have a story about someone who tried to bring a clicky keyboard into an open floor plan office with disastrous results. Clicky keyboards are not exactly discrete, which is why the “tactile” switch is a popular alternative.
Tactile switches forego the audible click when the key is activated. Instead they attempt to recreate the physical sensation of the click without any actual noise. Once the key switch has been pushed halfway down, you'll feel a slight "bump" in the key letting you know that the signal has been sent and you can let go of the key. It provides a typing experience similar to a clicky key, but with significantly less noise. Trust me, your desk mates will thank you.
Finally, “linear” switches don’t have any specific behavior halfway through the keypress when the signal is sent. They just have a smooth continuous press, and are generally the most quiet of the bunch. The lack of any physical feedback isn't everyone's cup of tea, but for plenty of typists, just seeing the letter appear on the screen is more than enough. Their understated typing experience is often popular for users making the initial switch over to mechanical keyboards who don't want to adjust to too many changes at once.
Beyond this switch behavior, one needs to decide on how heavy an “activation force” they’d like their keys to have. Switches are usually built with physical springs, and those springs can offer up varying amounts of resistance to the user's key presses. The activation force simply describes how many grams of pressure it takes to overcome this resistance and push a key down. Most manufactures at a minimum offer a “heavy” and “light” option for their key switches. One switch may take 70 grams of force to press, while their lighter option may only takes 50 grams. The more bespoke manufactures will often offer up a wider gradient of weight options.
Those are the two big switch decisions you need to make when buying a mechanical keyboard. What type of behavior do you want your switches to have, and how much resistance do you want them to offer. Manufacturers occasionally will offer some variants based on how noise-dampened the switch is, but generally your decision will just revolve around those two different axis.
You’d be forgiven if things looked far more complicated than that however. Rather than directly printing a switch’s characteristic on the plastic itself, manufacturers typically chose to produce differently colored switch stems in order to tell their different types of keys apart. Blue stems are light and clicky. Clear stems are heavy and tactile. Red stems are light and linear. The myriad of switch color options out there are really just codings for those two more basic choices.
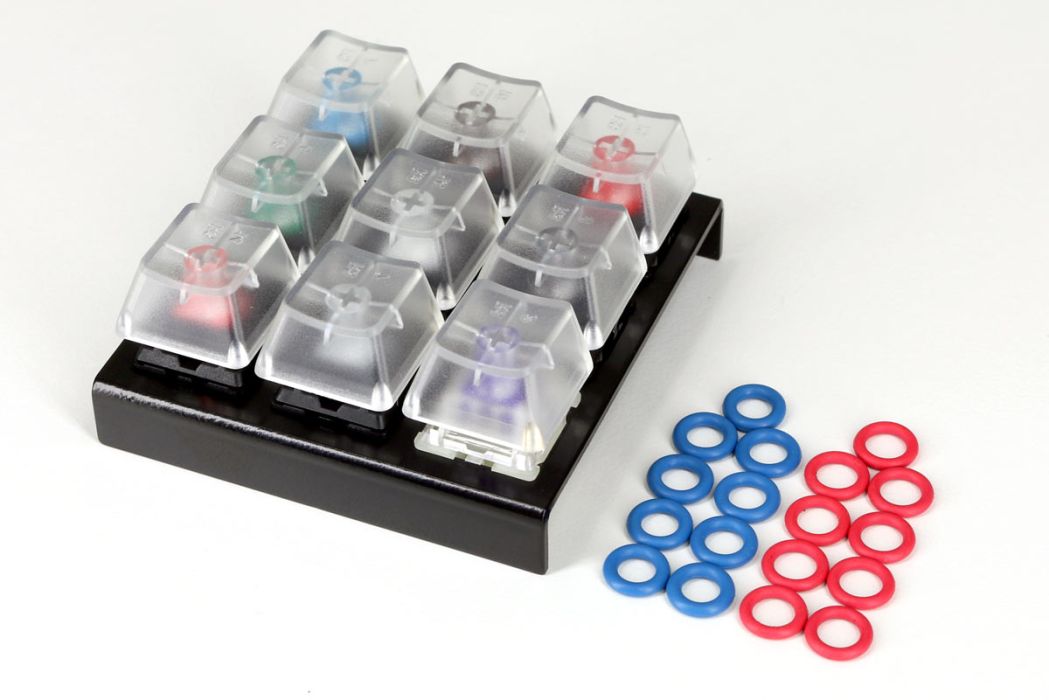
Keyboards are physical objects, and it’s difficult to describe via text or video the merits of one switch over another. When buying your first mechanical keyboard, it's worth trying out a few different key types before you make your decision. This is easy if you have some exceptionally geeky friends with a variety of switch tastes, but generally one just needs to bite the bullet and buy a switch tester with a variety of sample keys. Once you know which switch you’re going to go with, you'll then need to pick your keyboard layout.
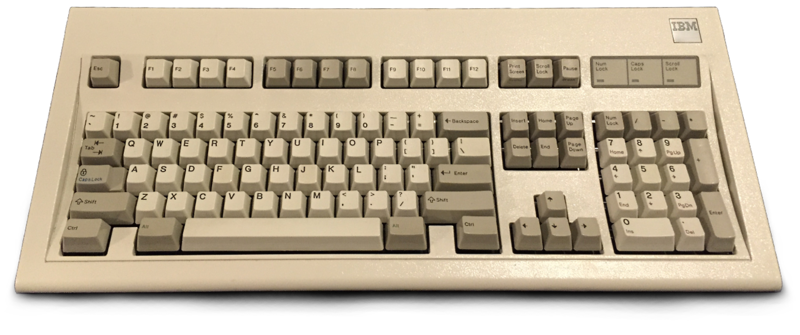
Most desktop keyboards are based off a 40 year old IBM PC standard and feature over a hundred keys. (The exact number varies based on where in the world you happen to be.) There’s a lot of residual cruft that’s built up over the years, and there’s arguments to be made that you don’t really need a Pause / Break key on a modern keyboard.
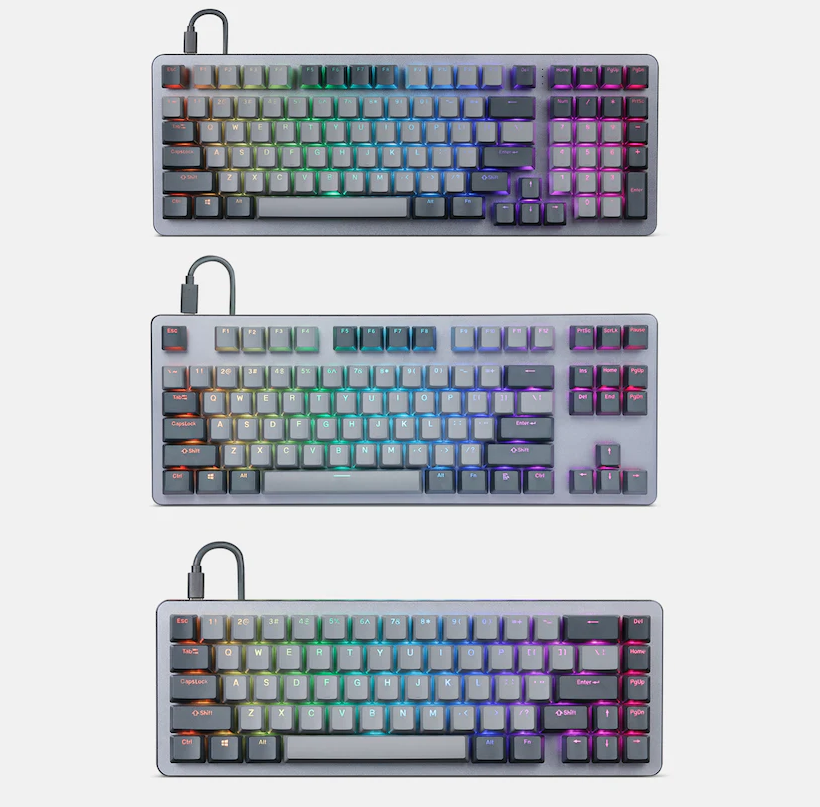
There’s a variety of keyboard layouts which help slim down the classic design. The popular “Tenkeyless” design helps free up some desk space by dropping your keyboard’s number pad. (It doesn't have the ten number pad keys. Ten-key-less. Get it?) Things get a bit more drastic from there. “75%” keyboards take the tenkeyless design and usually pull the arrow keys in for a more compact block, and “65%” designs drop the Function row entirely. Finally, “60%” keyboards take the minimalism and get rid of the arrow keys entirely.
There's endless variety on these basic layouts. A few have been canonized like the tenkeyless, but your keyboard layout of choice will boil down to personal taste. Laptop users may be familiar with ditching the number pad, but a lot of users may be less comfortable with the idea of needing to rely on function keys and modifiers just to tap and arrow key.
There’s no need to do anything too drastic at first. Grab a key switch tester, think about how often you use certain keys, and then buy something prebuilt off the shelf from a company like WASD or Keychron. It’ll set you back about $150 to figure out if these sorts of keyboards are for you. If your starter board starts to go stale, you can even buy a set of cheap keycaps to liven it up.
Getting Geeky
At this point you’ve got a nice sturdy keyboard. It had a few more buying decisions than picking up a Logitech keyboard from Best Buy, but it’s suspiciously close to a standard consumer transaction. Where’s the hobby aspect come into play?
Well, you may have noticed me use the word “prebuilt” to describe the entry level keyboards in the last section. You can buy a keyboard that’s fully assembled and ready to go, but it’s also possible to buy and assemble a keyboard out of individual parts.
A mechanical keyboard is comprised of a few types of components. There’s the microcontroller at the heart of the keyboard, the actual PCB that houses all the keys, the individual key switches, the keycaps for the switches, and often a case for the keyboard.
The primary benefit you get from building your own keyboard from scratch is that you’ve got a much larger pool of switches to chose from. Most prebuilt manufactures only offer a half dozen key options from one or two brands. If you’re assembling your own keyboard, you can start dabbling with boutique key switch manufactures. Companies like ZealPC and Drop specialize in making exceptionally quiet or particularly clicky keys that can fit in any standard MX formfactor board.
The actual DIY boards themselves vary in complexity. Some of them are incredibly straightforward. Many large keyboard manufactures will offer switch-less versions of their most popular boards. You need to add the switches yourself, but everything else is already assembled for you. On the opposite end of the spectrum, boutique manufacturers and hobbyists will use the flexibility of small-batch runs to get experimental with the form factors and feature sets of their keyboards. These boards are usually a bit more barebones, requiring the builder to solder in an Arduino microcontroller and other ancillary support hardware. The scene now has a myriad of RGB LED lit keyboards, split keyboards, and even keyboards with integrated trackpads. As long as you can get past an exorbitant price tag, there’s probably a keyboard out there for you.
Speaking of prices, you know you’re in for trouble when you start hearing phrases like “Artisan Keycaps”. Keycaps are the component that’s the easiest to swap out on a mechanical keyboard, so there are countless keycap sets ready to meet whatever theme or aesthetic you’re going for.
…eventually. The hobbyist keycap scene often works on a group buy model. Buyers will pool their money together and preorder a keycap set before the manufacturing process has actually begun. Popular keycap sets will often go out of stock for the better part of the year, or occasionally only ever get one print run.
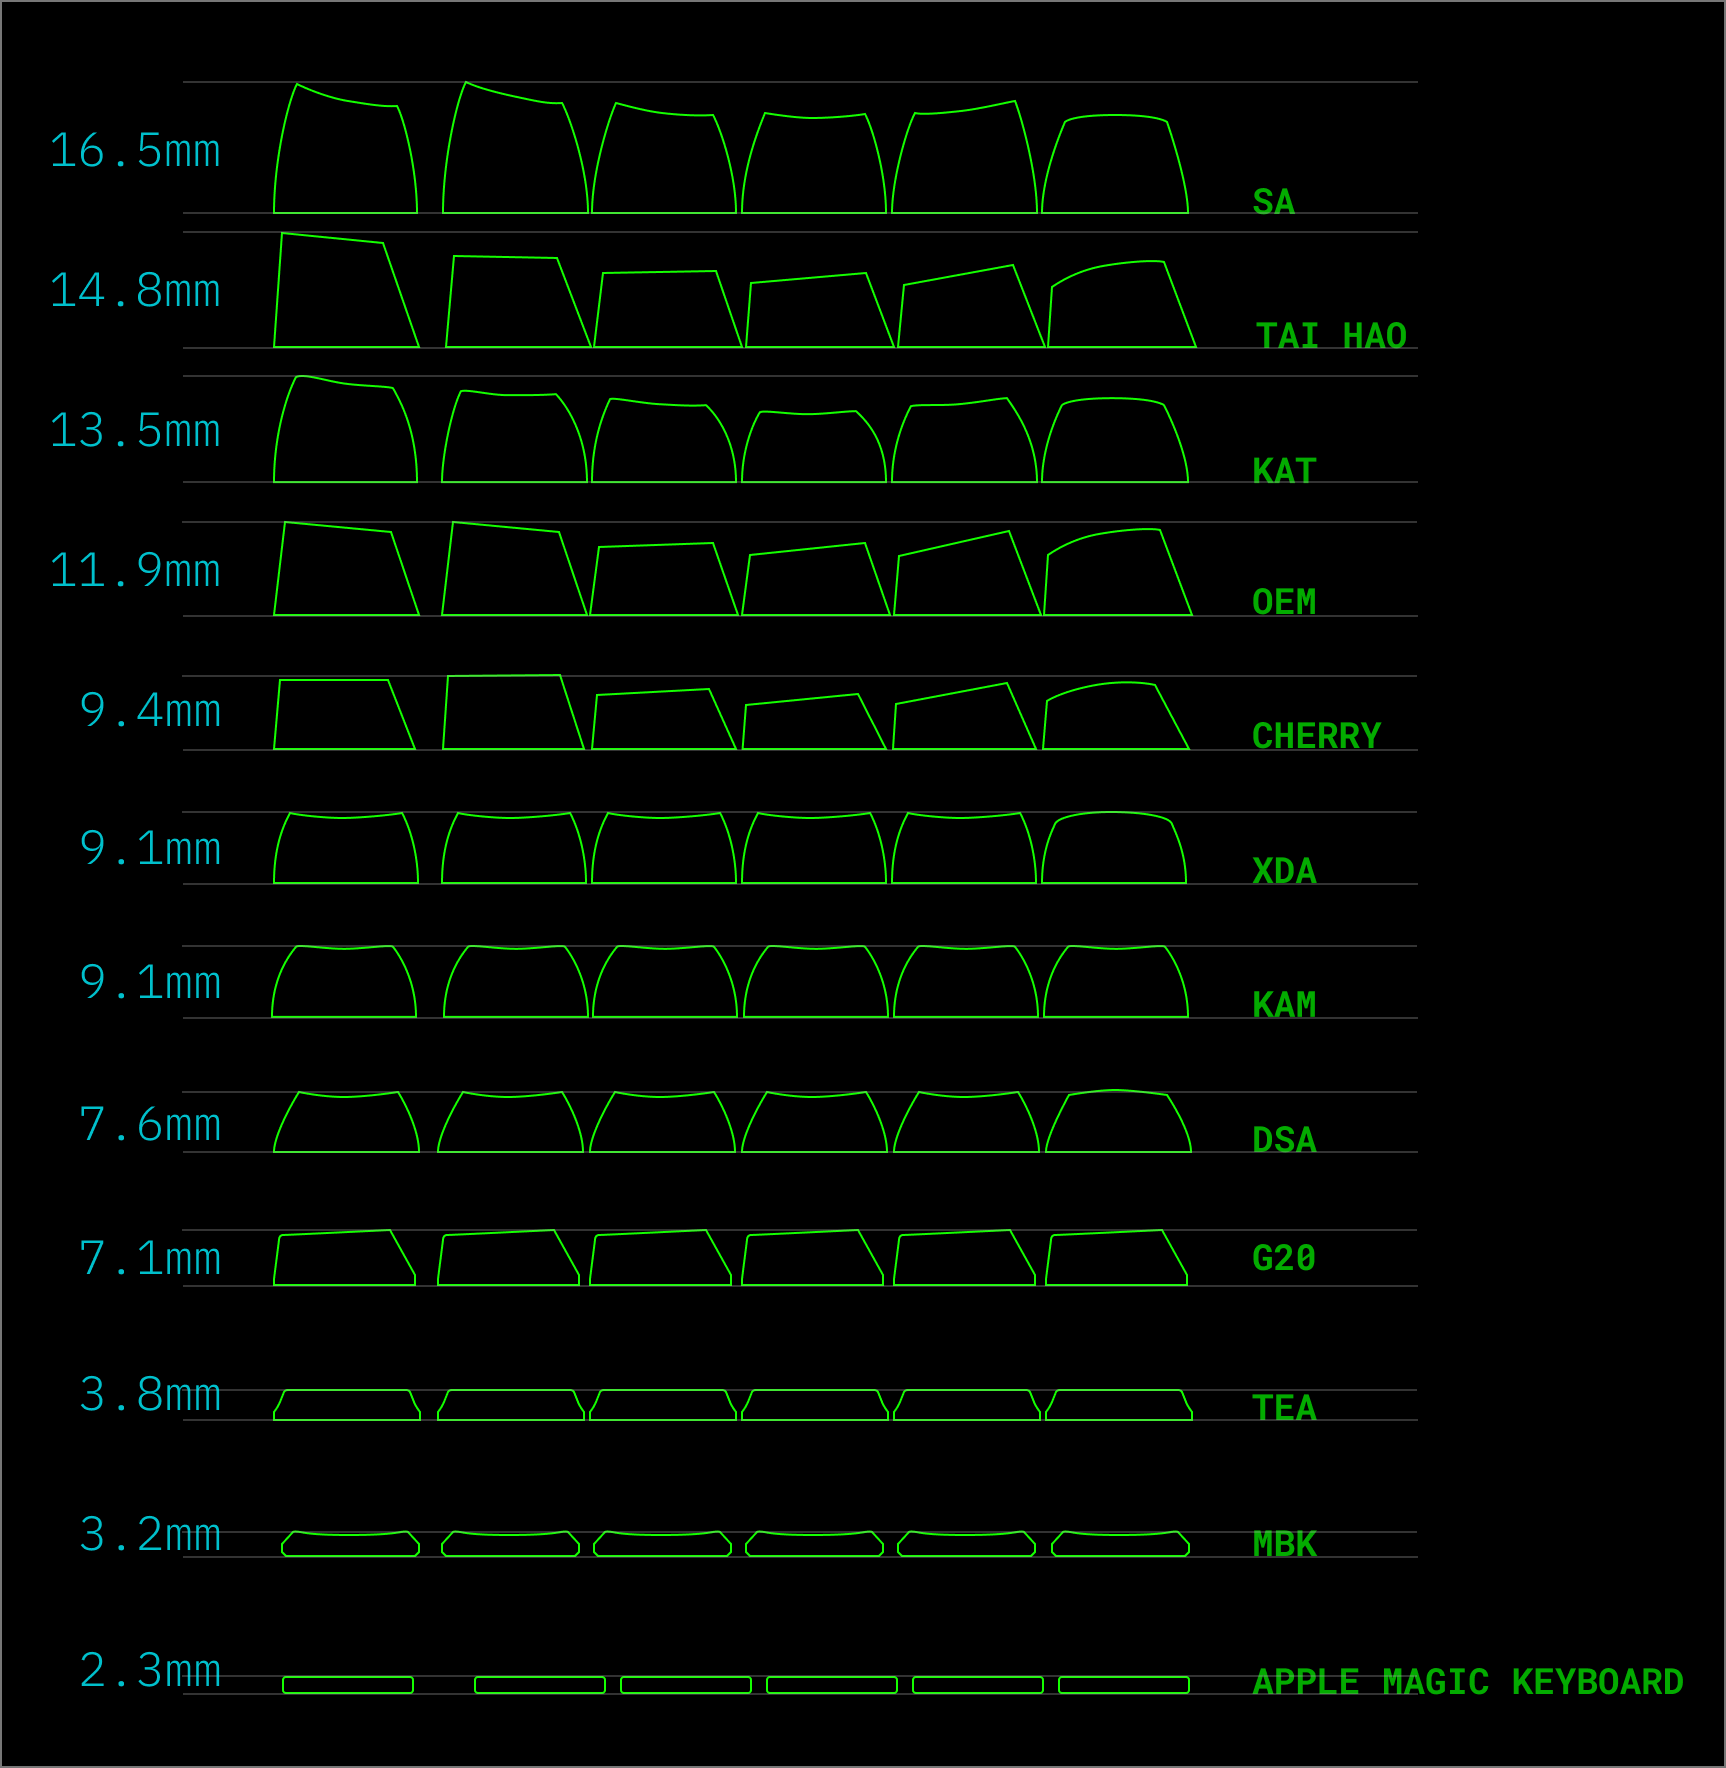
In addition to different color schemes, keycaps can also offer several different shape options for DIY keyboards. These "profiles" range from the familiar sloped shapes you've likely experienced the vast majority of keyboards you've encountered, to a more flat keyboard shapes for those looking to switch things up. (If you're trying to find your off the shelf keyboard's profile on the diagram, chances are you're on a Cherry or OEM board.)
Finally, many keyboards will offer a case. These can be simple pieces of plastic, machined aluminum, or even community 3D printed designs. Cases aren’t strictly necessary however. Some of the more custom keyboards will just put rubber feet on the bottom of the bare PCB.
Put this all together, and you’re ready to order parts from a half-dozen manufacturers. A typical hobbyist build could include around $100 USD in parts from Keeb.io to build their split Quefrency board, another $100 USD for quiet Zilent switches from ZealPC, and around $50 to $100 USD on a set of keycaps. Make sure to budget another $100+ USD for an acrylic case unless you’re happy with rubber feet or know someone with a 3D printer. After an evening of soldering, you’ll have a nice personalized keyboard worthy of running off and showing /r/mechanicalkeyboard.
Software Shenanigans
Keyboards aren’t known for their intelligence. The earliest keyboards simply knew how to send basic serial signals before making the switch to simple USB commands. Even some enthusiast keyboards continue this barebones tradition. WASD’s mechanical keyboards have a basic USB connection, and only offer customization by exposing a set of physical toggle switches on the bottom of the keyboard to adjust settings like Mac and Windows keymaps.
Increasingly however, keyboards are beginning to house some legitimate processing power. Managing RGB LEDs is not a simple task, and additional components like OLED screens require some real intelligence on the keyboard itself.
There’s two ways you can manage these newfound capabilities: Built into the keyboard, or with client side software drivers. Most mainstream gaming keyboards generally go with this later approach. Logitech and Razer have all sorts of over the top software suites letting you accomplish complex feats like syncing the backlights of your keyboard with your current hero in Overwatch. It’s a fine approach when you’re looking for deep integration between software and a keyboard, but it does introduce a few unusual edge cases when switching between machines or dealing with particularly finicky hardware or software comparability.
The enthusiast mechanical keyboard scene has generally gravitated towards keyboards that manage their unique functionality on the keyboard itself. Rather than needing to rely on a specific software driver, the user can simply leverage built-in hotkeys to cycle through features like advanced RGB LED light patterns.
Conceptually this groks a bit better with the idea of a keyboard being a self contained peripheral. No matter which system you plug your keyboard into, it will behave the same. All of the fancy lighting and custom macros are obscured away from the host machine, and no matter how complicated your device is, it still just appears as a standard keyboard.
The downside of this approach is that it usually limits the amount of customization available to you. A Keychron keyboard for instance may have 20 different light patterns programmed into it, but you’re usually stuck with those preloaded patterns. If you were using software drivers on something like a Razer keyboard, you can go wild and say, create a backlight pattern where the letters of your partner’s name are colored differently. On keyboards with fixed firmwares, you're stuck with the out of the box experience.
To help mitigate this issue, enthusiast keyboards have just started integrating an entire reprogrammable microcontroller. It turns out there’s very few things in the embedded electronics world that can’t be solved by just strapping an Arduino to the side of it.

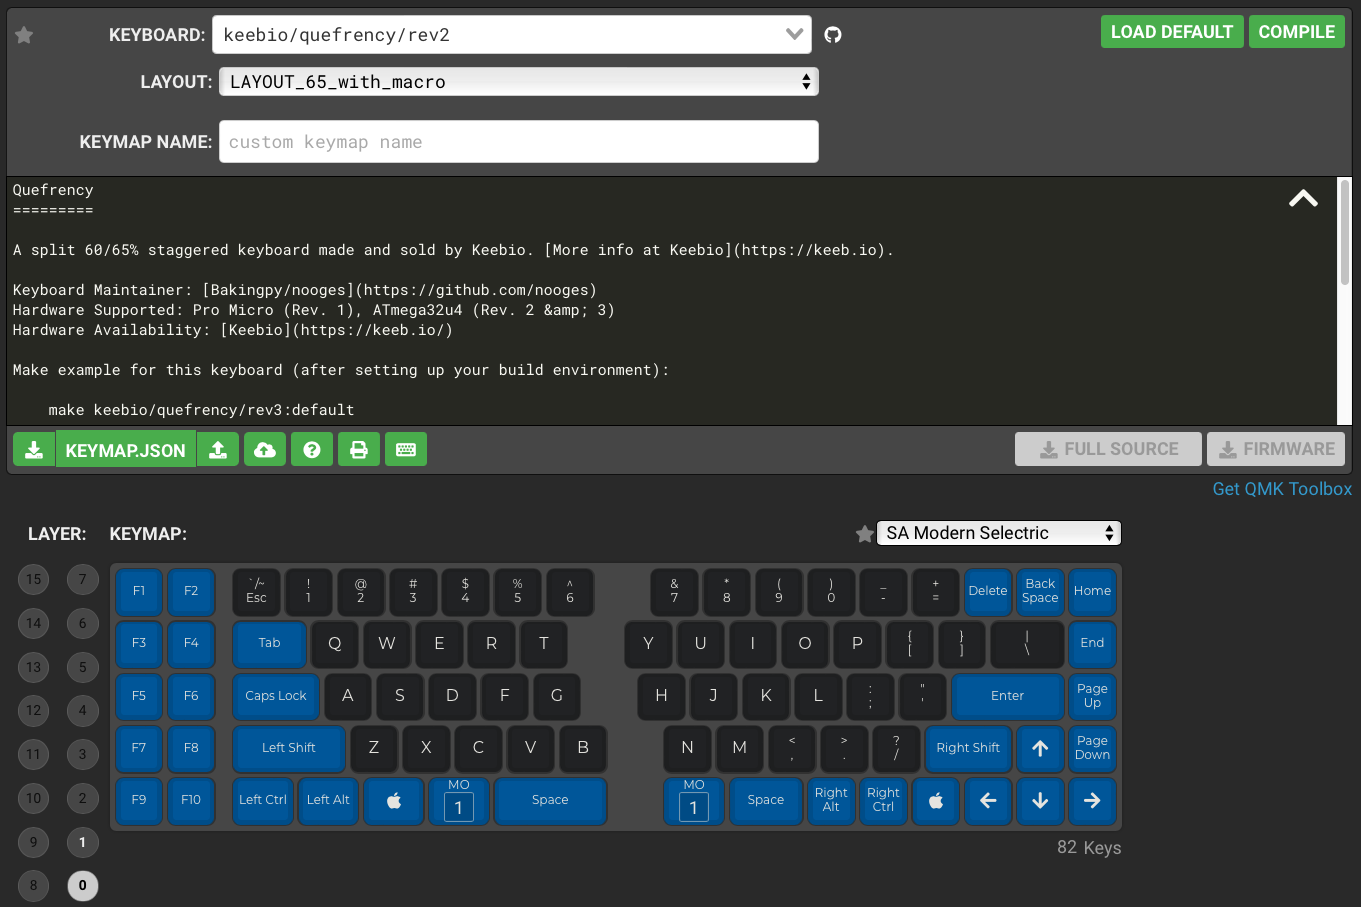
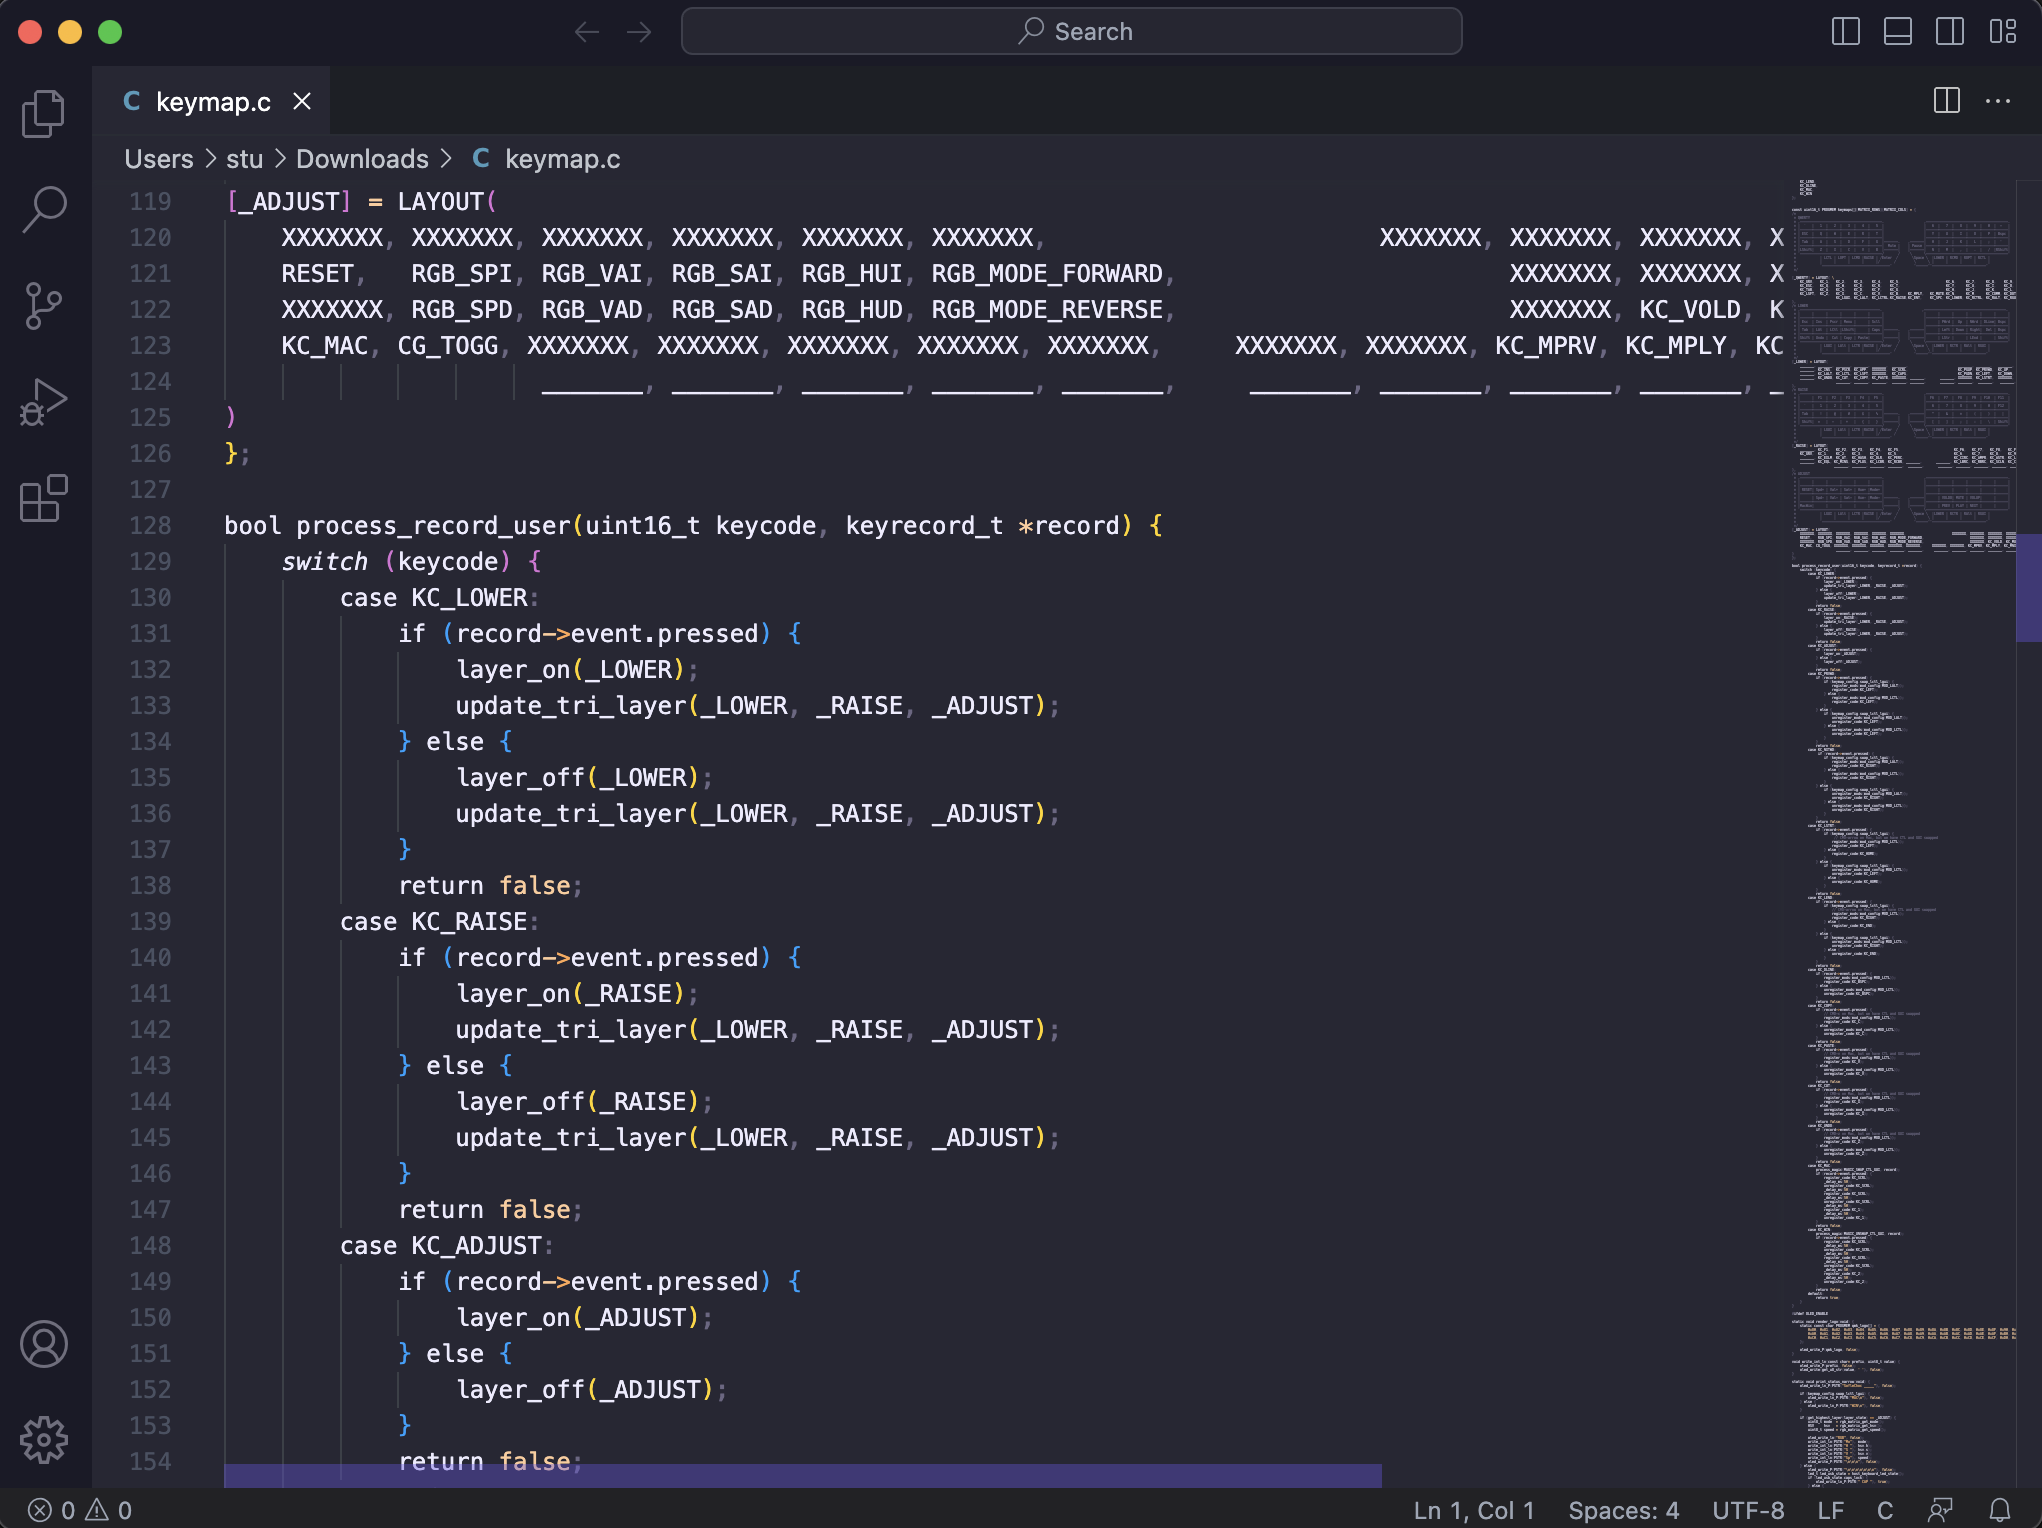
The Arduino Pro Micro and its ATmega32U4 microprocessor has become the de facto standard for hobbyist keyboards. Pair it with the open source QMK keyboard firmware, and you can get a mechanical keyboard to do just about anything. QMK can control RGB LEDs, manage LCD screens, and provide a myriad of macro key behavior. It can be a little intimidating edit C config files and compiling your own firmware binary, but thankfully tools like the QMK Configurator and VIA have provided useful GUIs for those who are only up for moderate amounts of tinkering.
Proprietary keyboard firmwares are becoming increasingly rare, but it’s still worth double checking that the wired keyboard you have your eye on runs QMK. Custom Bluetooth keyboard firmwares are still fairly common for prebuilt boards, but open source options have started to crop up on the DIY side. The Nice!Nano microcontroller is a drop-in wireless replacement for the Arduino Pro Micro, and its wireless ZMK firmware is philosophically similar to QMK.
Hot-Swap Fever
When looking at the overall cost of a mechanical keyboard, the key switches are always the deceptively expensive part. The board’s about $50 USD, the keycaps are around $50-100 USD, and the key switches are $5-12 USD for a pack of 10 switches. That’s not too bad, right? Well, most keyboards have between 60 and 110 keys. On the low end, you’ll be able to outfit a small board with standard Cherry MX red switches for under $50. If you have a larger board, or go for something a bit more expensive like the ZealPC Zilent switches, suddenly you’re spending $100+ USD on just the switches for your build.
And you might not even like them! As I mentioned earlier, you generally need to buy a key switch tester to get a feel for which type of key you may prefer. There’s a big difference between having one sample key to tap with your index finger and having an entire board to experiment with. You might spend hundreds of dollars on a build, solder the keys into place, and realize you don’t actually like them. It’s a harrowing proposition for both first time builders and experienced folks who just like to experiment.
Wouldn't it be great if you didn't need to commit to a switch type when building a keyboard? Well, it turns out you don't have to worry about permanently soldering switches that aren't your cup of tea anymore. In the past few years, keyboards have started to incorporate the option of including so-called "hotswap sockets". The sockets are small pieces of plastic and metal that act like Game Boy cartridge slots for your key switches. They slot completely into place via friction alone, and are easy enough to pull out if you're not satisfied with them. If you bought a bunch of Red switches and it turns out you’re more of a Blue fan, all you need to do is buy a new set of switches. You can skip the process and sunk cost of having to re-buy and re-solder an entire second keyboard.
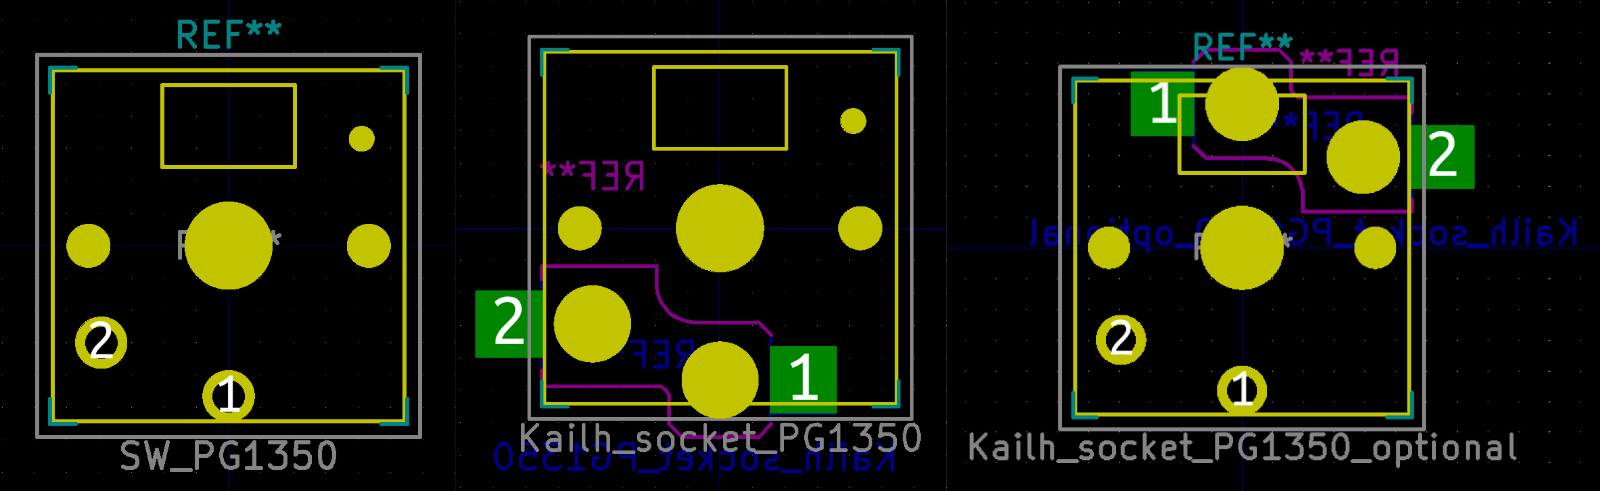
Hotswap support isn’t universal on keyboard PCBs at the moment, but it’s becoming more common. It’s possible to create a keyboard with support for both soldering and hot swapping, although adding additional functionality like per-key lighting can become slightly more complicated. The hotswap sockets themselves cost about $15 USD for 100 sockets, so it’s not exorbitantly expensive to add this functionality to a keyboard who’s design you’re on the fence about. Even for enthusiasts who know exactly what switch type they prefer, it's still nice to invest in 100 solid key switches and move those around as you experiment with different board layouts.
Ridin’ Low
Alright, it's time for the real hardcore nonsense. Making a bespoke custom mechanical keyboard is great, but you know what’s even better? Making one that’s smol. Get enough nerds in an online community together, and eventually someone will try to optimize the living daylights out of that community's tech and put it in a tiny package. It happened with the small formfactor PC community, and it’s happened here too.
Low profile keyboards have switches that are somewhere between laptop keys and traditional mechanical keyboard switches. They still have a bit of travel to them, but not a ton. The activation force needed to push a low profile switch is usually less than that of a full sized keyboard as well, so they’re popular options with folks looking to minimize repetitive stress in their daily computing.
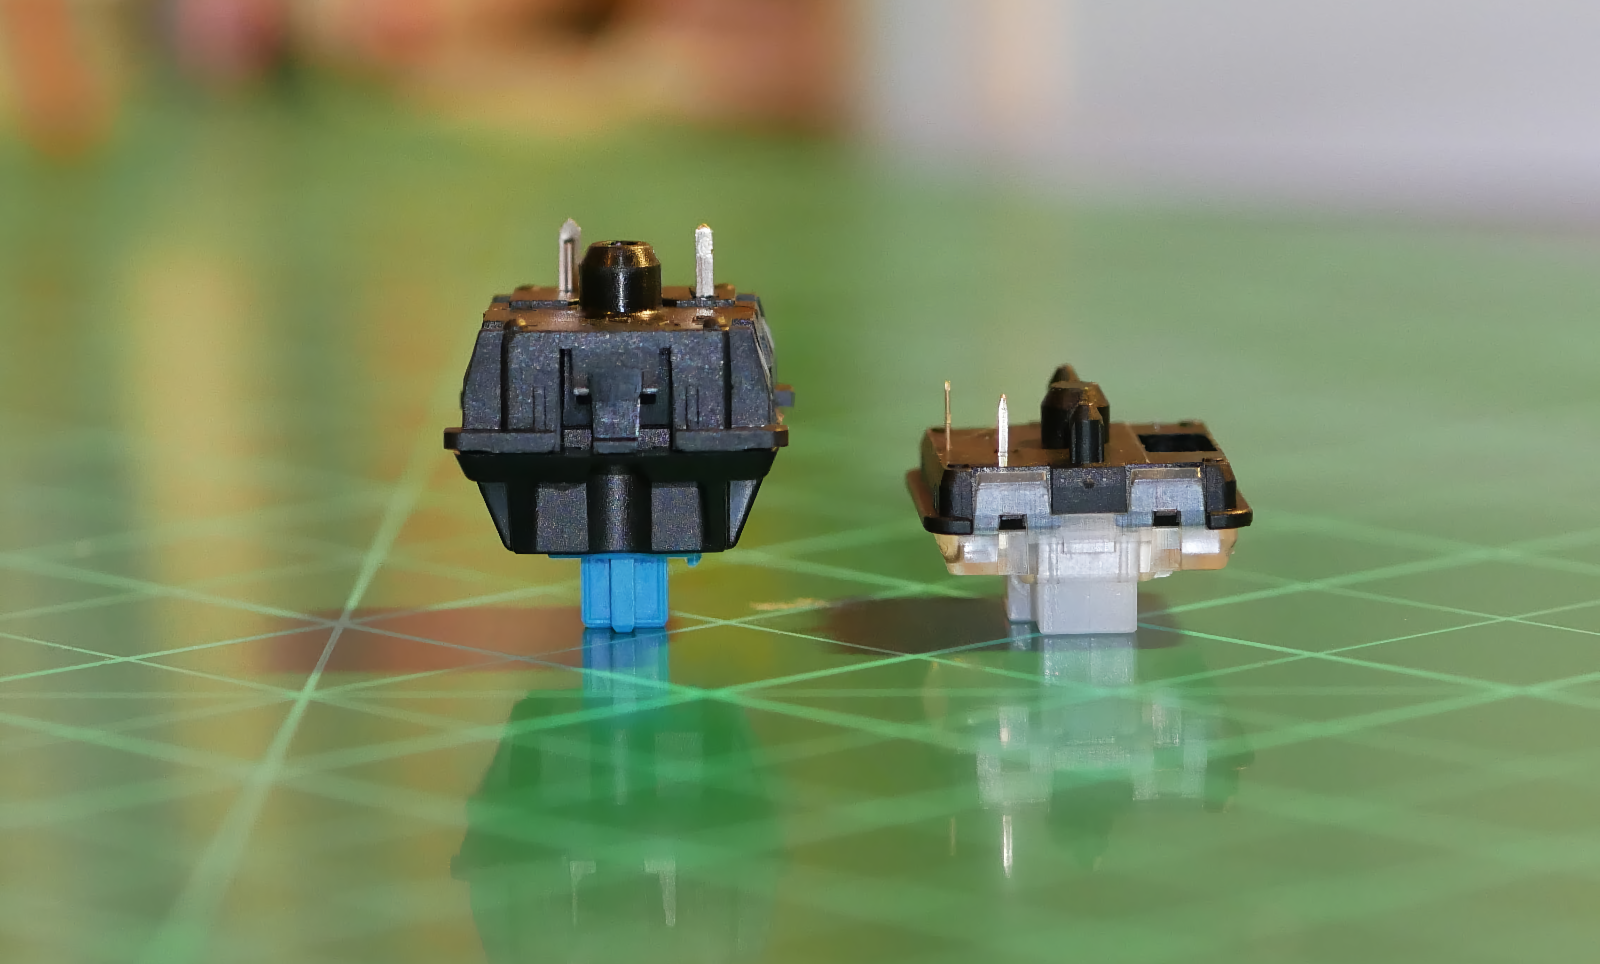
The most popular key switch for low profile keyboards is the Kailh Choc. This switch has both a v1 and v2 variety, and interestingly enough, the community has mostly championed the original v1 switch. The v2 switch has a similar design, but chose to use a cross-shaped MX style switch stem. This is great for maintaining compatibility with 99% of existing keycap sets… but you know what else is really tall? 99% of existing keycap sets!
Kailh Choc v1 keycaps are usually small, flat, and chiclet-style. There aren't a ton of options out there at the moment. If you like keycaps with legends, your options are: Black, white, gray, and black with shine through letters. That’s it. Blue’s coming later in 2023. For blank keycaps, you can at least purchase them in a variety of colors.
Despite the small ecosystem, these low profile keys are versatile enough to fit a variety of designs. The caps are available in the standard 1u square, as well as longer 1.5u and 2u sizes. The lack of legend options is a little frustrating, but most of these boards are small enough that it's not a dealbreaker. You’re already having to map the = key to Fn+Z. At a certain point you just need to start remembering which key does what.
Why The Sofle Choc?
Would you look at that! Three thousand words later, and we’re finally ready to discuss the keyboard we set out to talk about.
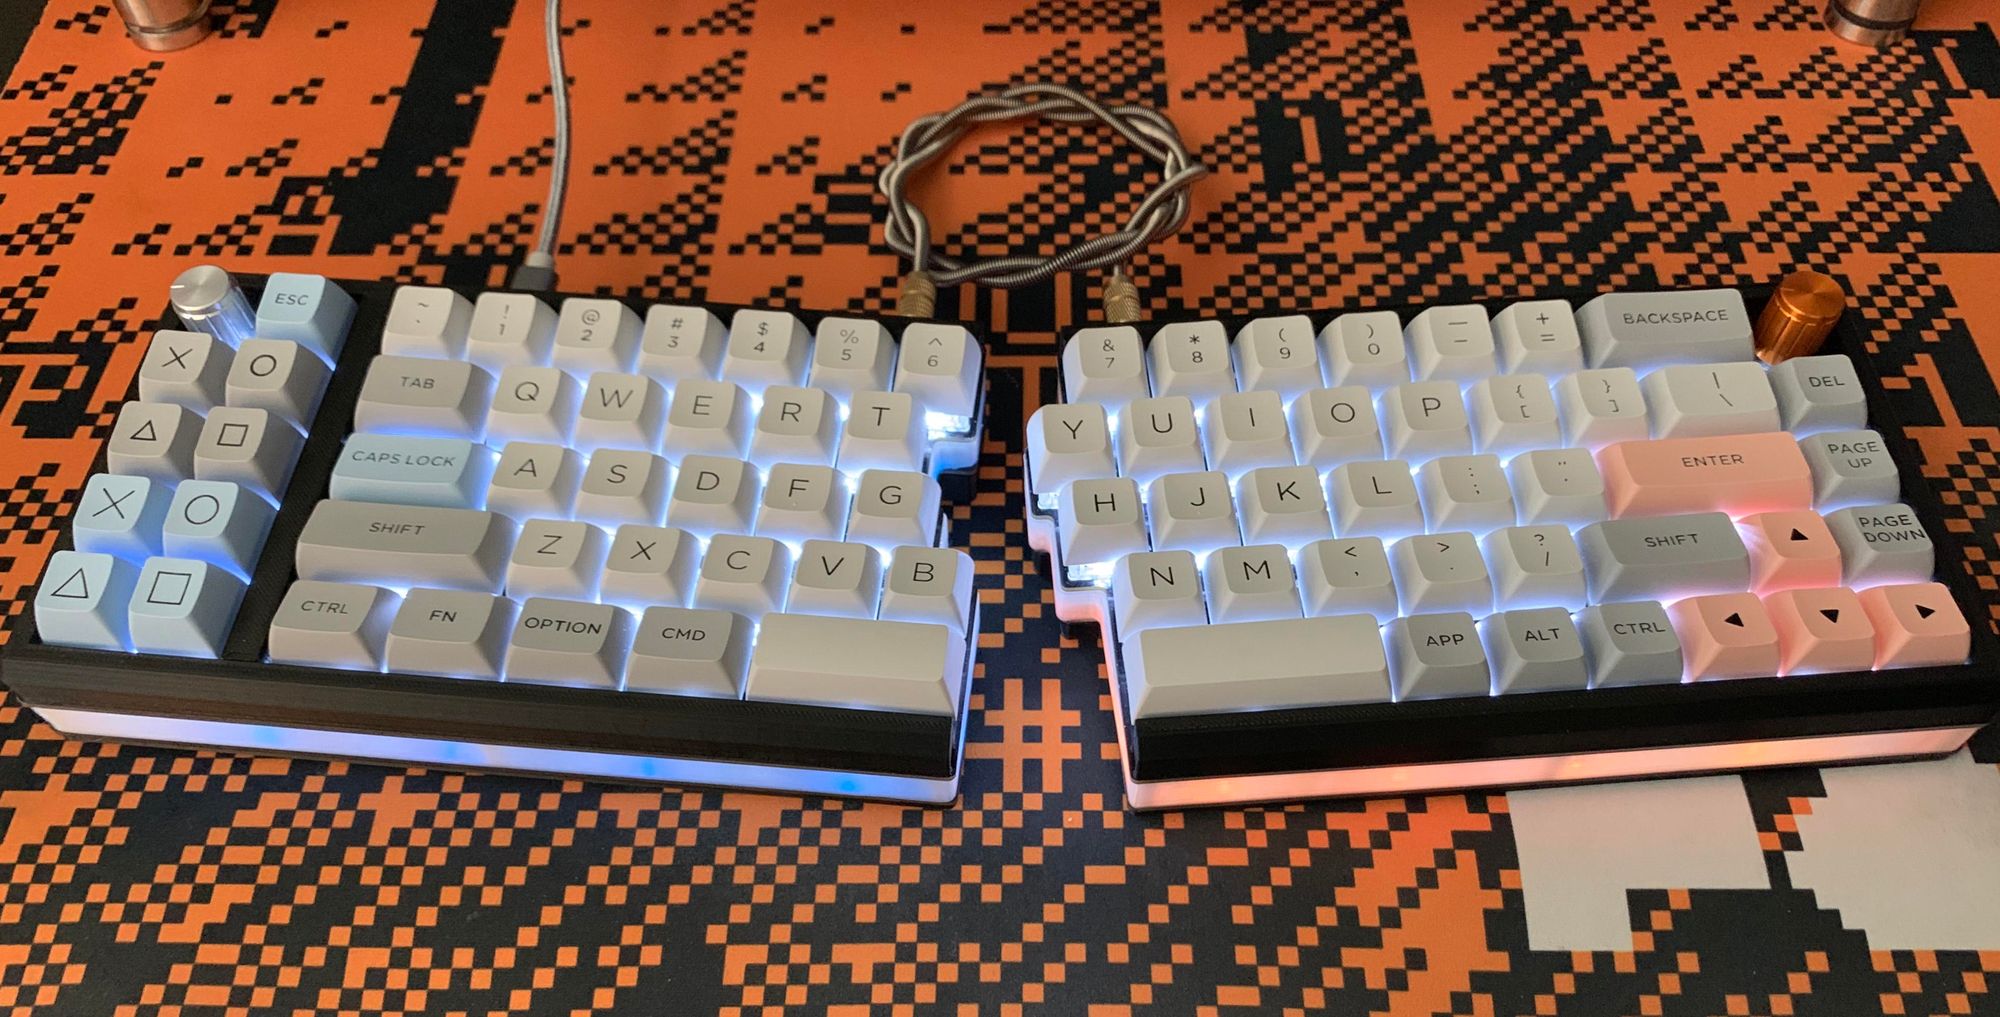
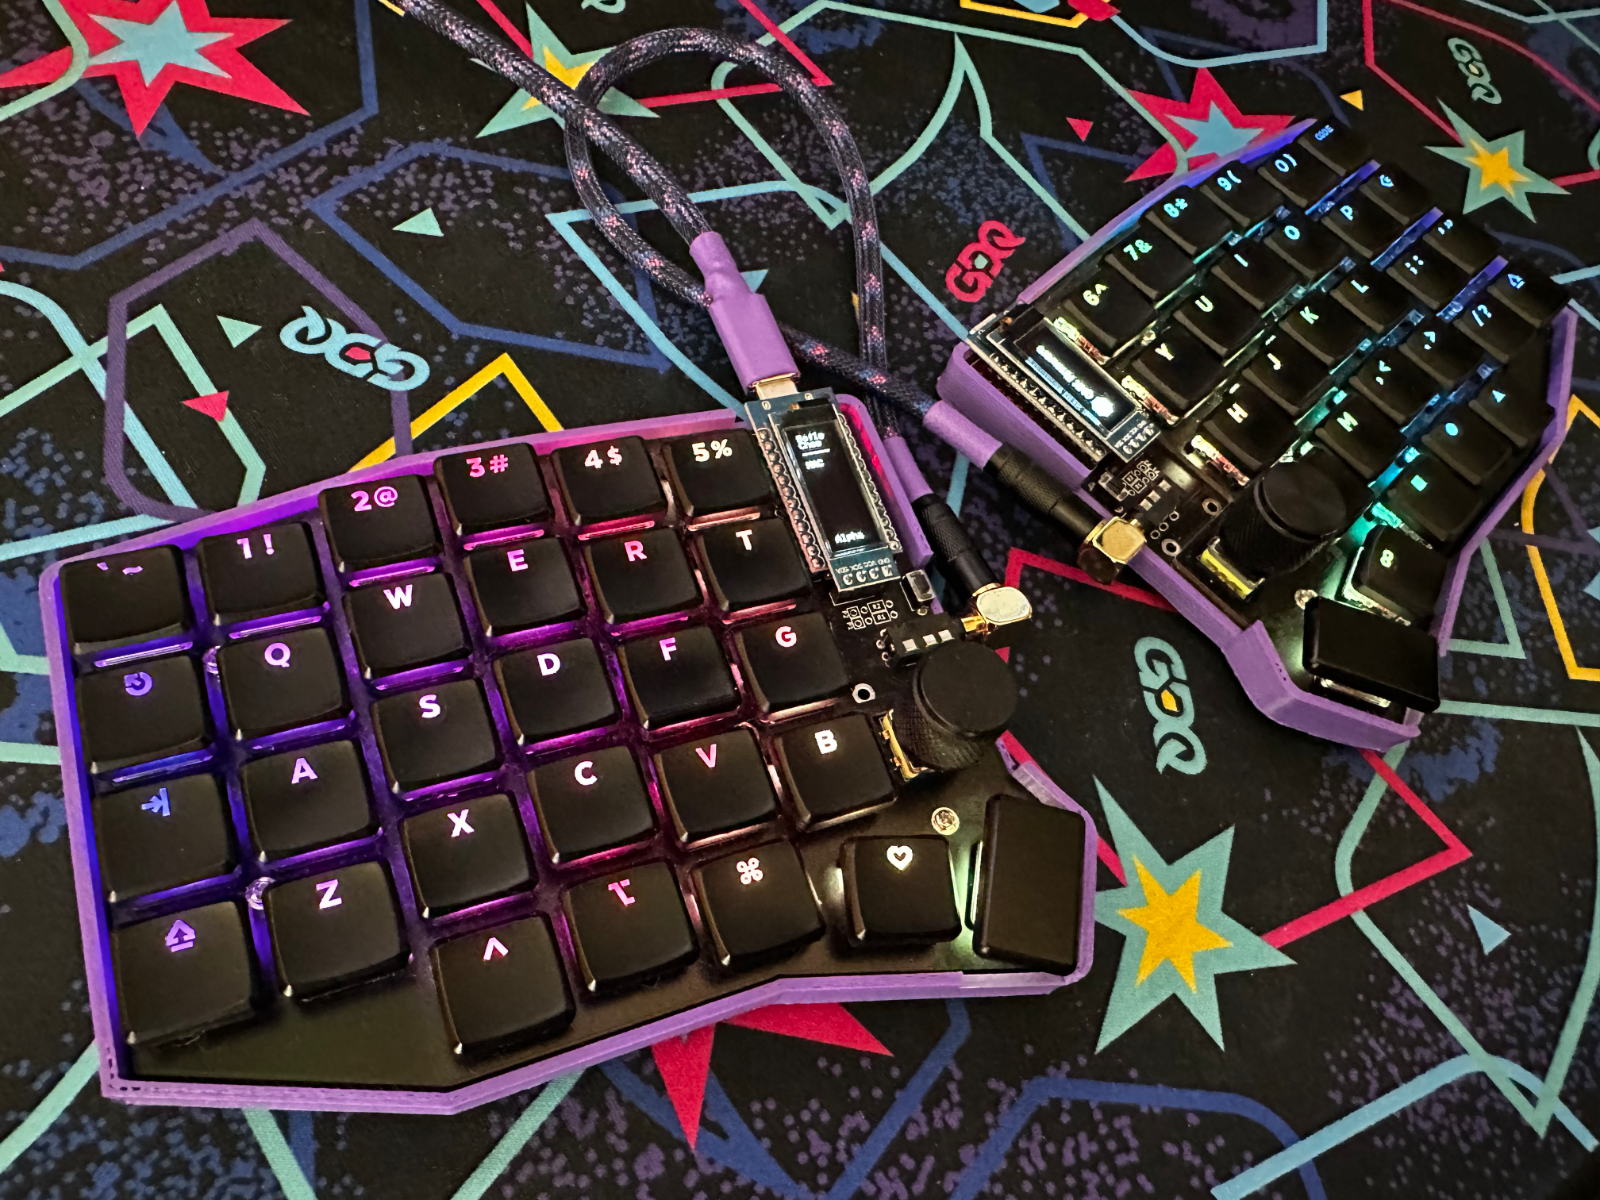
The Sofle is a split ergonomic keyboard design originally created by Josef Adamčík. There's a couple things to unpack there. Most obviously, this keyboard has two distinct halves connected by a headphone-style TRRS cable. People have found that typing with both of your arms pointed forward puts a bit less stress on your wrists than the typical typing posture of bowing your arms together at a 45 degree angle. This isn't the only ergonomic bit the Sofle has going on however.
A standard keyboard has rows that are slightly offset. The X key isn't directly below the S key for instance. There's a stagger to their rows. This can lead to odd hand twisting when a key doesn't obviously line up with any of your finger's normal resting position. Is it the responsibility of your ring finger to slide down from S to type X, or should your middle finger curl in from the D to tap the X?
Everyone’s heard that anecdote about modern keyboard layouts hailing from designs intended to slow down typing and stop typewriter jams, right?
Some keyboard enthusiasts have started moving away from this classic “Row Staggered” layout. “Ortholinear” keyboards like the Planck take this to the extreme, and have designs which perfectly align every key on a horizontal and vertical axis. There's no confusion about which finger should be sliding down to tap the X on this style keyboard layout.
The Sofle doesn’t go quite as far as an orthlinear layout, and instead opts for a “Column Staggered” layout. In this type of layout, all of the rows are lined up, so your X key is directly under your S key, but the columns have a slight stagger to them. This tries to acknowledge the natural curl of a human hand, hence the Sofle's ergonomic description. You still get the nice benefit of the X key being a quick slide of the finger under the S key, but you don't need to adhere to the Ortholinear's strict straight lines.
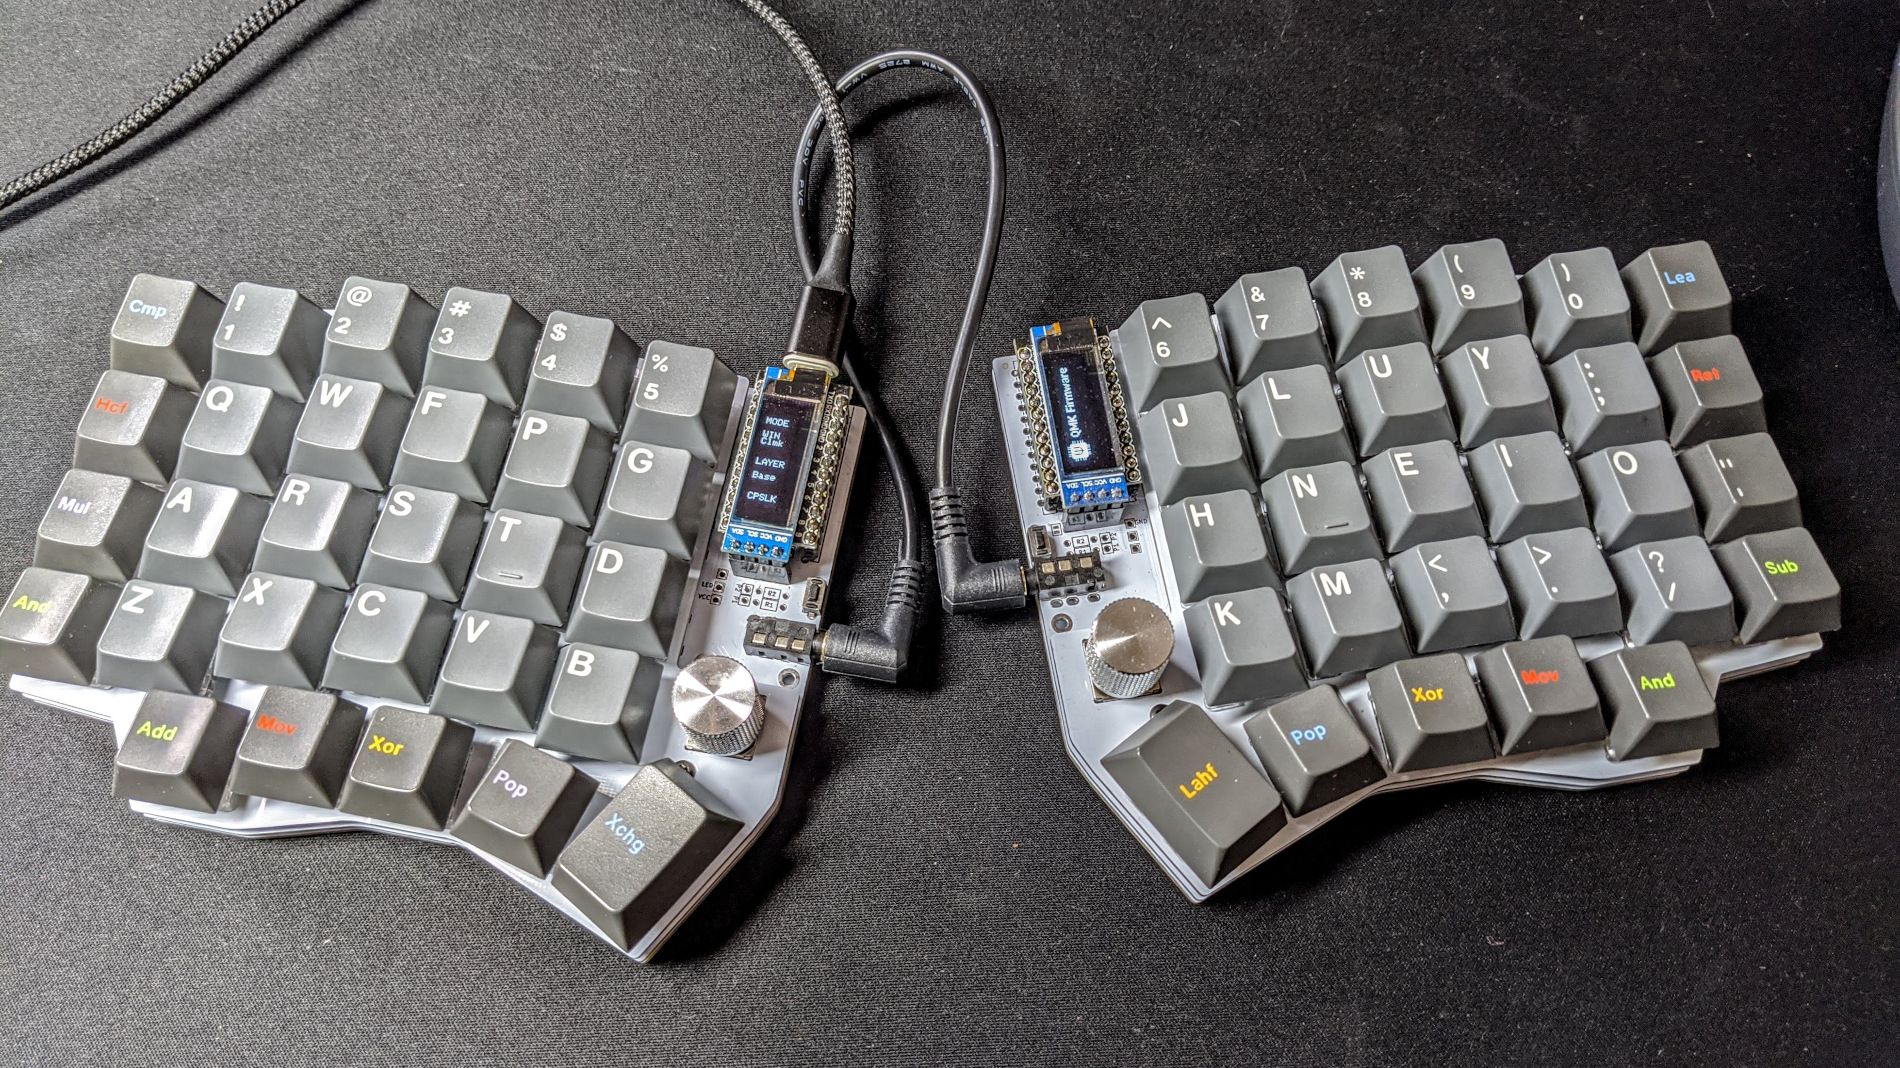
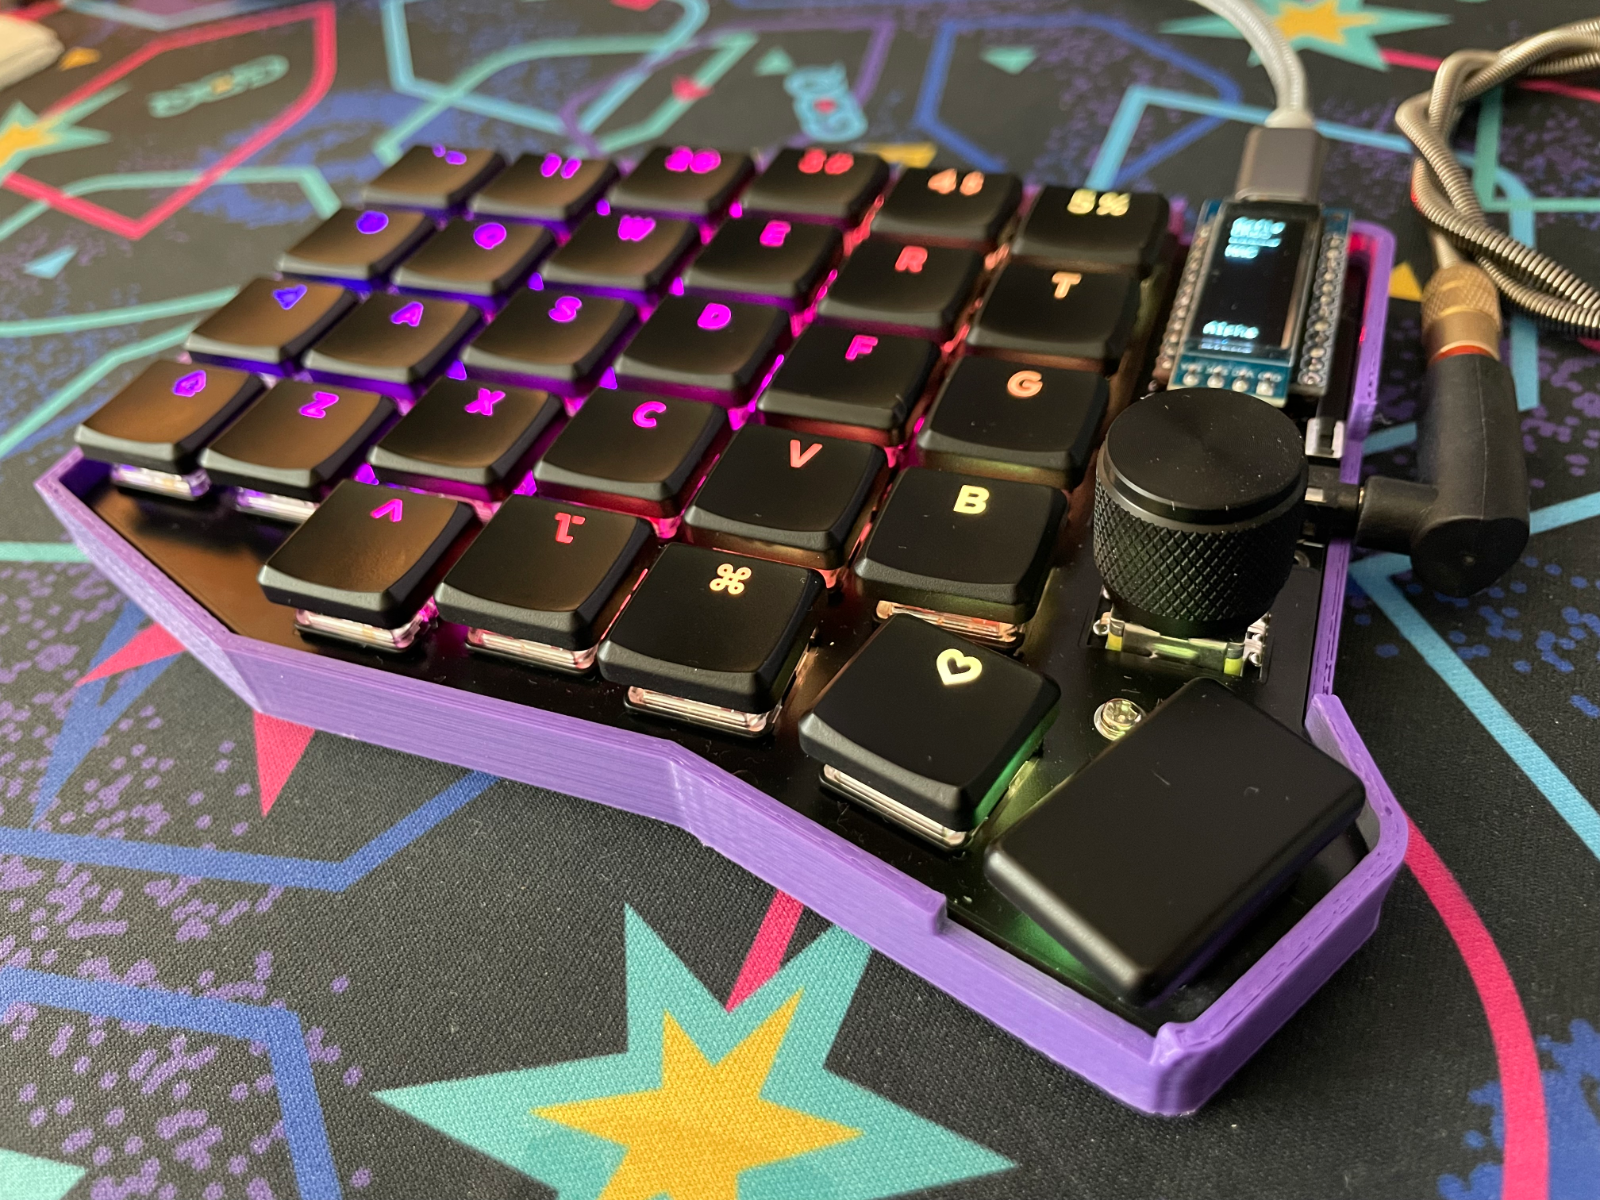
The original Sofle design has several variants. The Sofle Choc board we’re looking at today is a riff created by Brian Low. It introduces Choc hotswap sockets, and retains the per-key RGB LEDs first introduced in the Sofle RGB.
The Sofle Choc checked a lot of boxes for me. When I first started exploring building a new keyboard, I wanted something that was a significant enough departure from my earlier Keeb.io Quefrency build. It was a split keyboard too, but it had a traditional row stagger layout, and the backlight LEDs weren’t individually addressable. The combination of the Sofle’s new layout, the per-switch RGB LEDs, and the low profile Choc switches were enough to make me consider building another keyboard. It didn’t hurt that the Sofle Choc would also give me a good excuse to experiment with OLED screens on a keyboard.
Building The Sofle Choc
Outside of commissioning someone to build it for you, the Sofle Choc is only available as a DIY project. Whether you buy a full kit or source the parts separately, you’re in for a soldering project that will take up the better part of an afternoon.
Soldering is a bit of an intimidating skill to pick up. You’re working with temperatures that can melt metal, there’s a lot of stuff you need to buy, and you can brick your project if you make a mistake. It doesn’t take too much practice to gain a bit of confidence however, and introductory soldering irons are cheaper than you’d think.
Keyboards are actually a surprisingly good place to practice soldering. They usually don’t employ advanced soldering techniques (although the Sofle dabbles with one), and due to the nature of a keyboard, everything’s nice and spaced out. I wouldn’t recommend learning how to solder on a keyboard however. An intro soldering kit will set you back about $60 USD, and a simple “learn to solder” project with a few LEDs and buttons will generally cost about $10-20 USD. It’s worth the superfluous extra expense to get the hang of things before diving straight into your keyboard. Each half of the Sofle has 29 keys on it, and if you botch one of them, you’ll have to start dealing with cumbersome de-soldering or other hacks to try and salvage your board.
The complete ≈$140 USD kit for the Sofle Choc comes with: The PCBs, the hotswap sockets, diodes, LEDs, two Arduino Pro Micro controllers, two OLED screens, sockets for the microcontrollers and screens, rotary encoders and knobs, TRRS plugs, a TRRS cable, a reset switch, and some rubber feet. You need to purchase the Choc switches (≈$40 USD) and keycaps (≈$70 USD) separately.
Brian Low’s build guide for the Sofle Choc is one of the more thorough guides on the internet. He walks through every step in detail and includes plenty of pictures. He’s even got a few nice touches, like making sure your first step to label which side is “up” on your two identical PCBs.
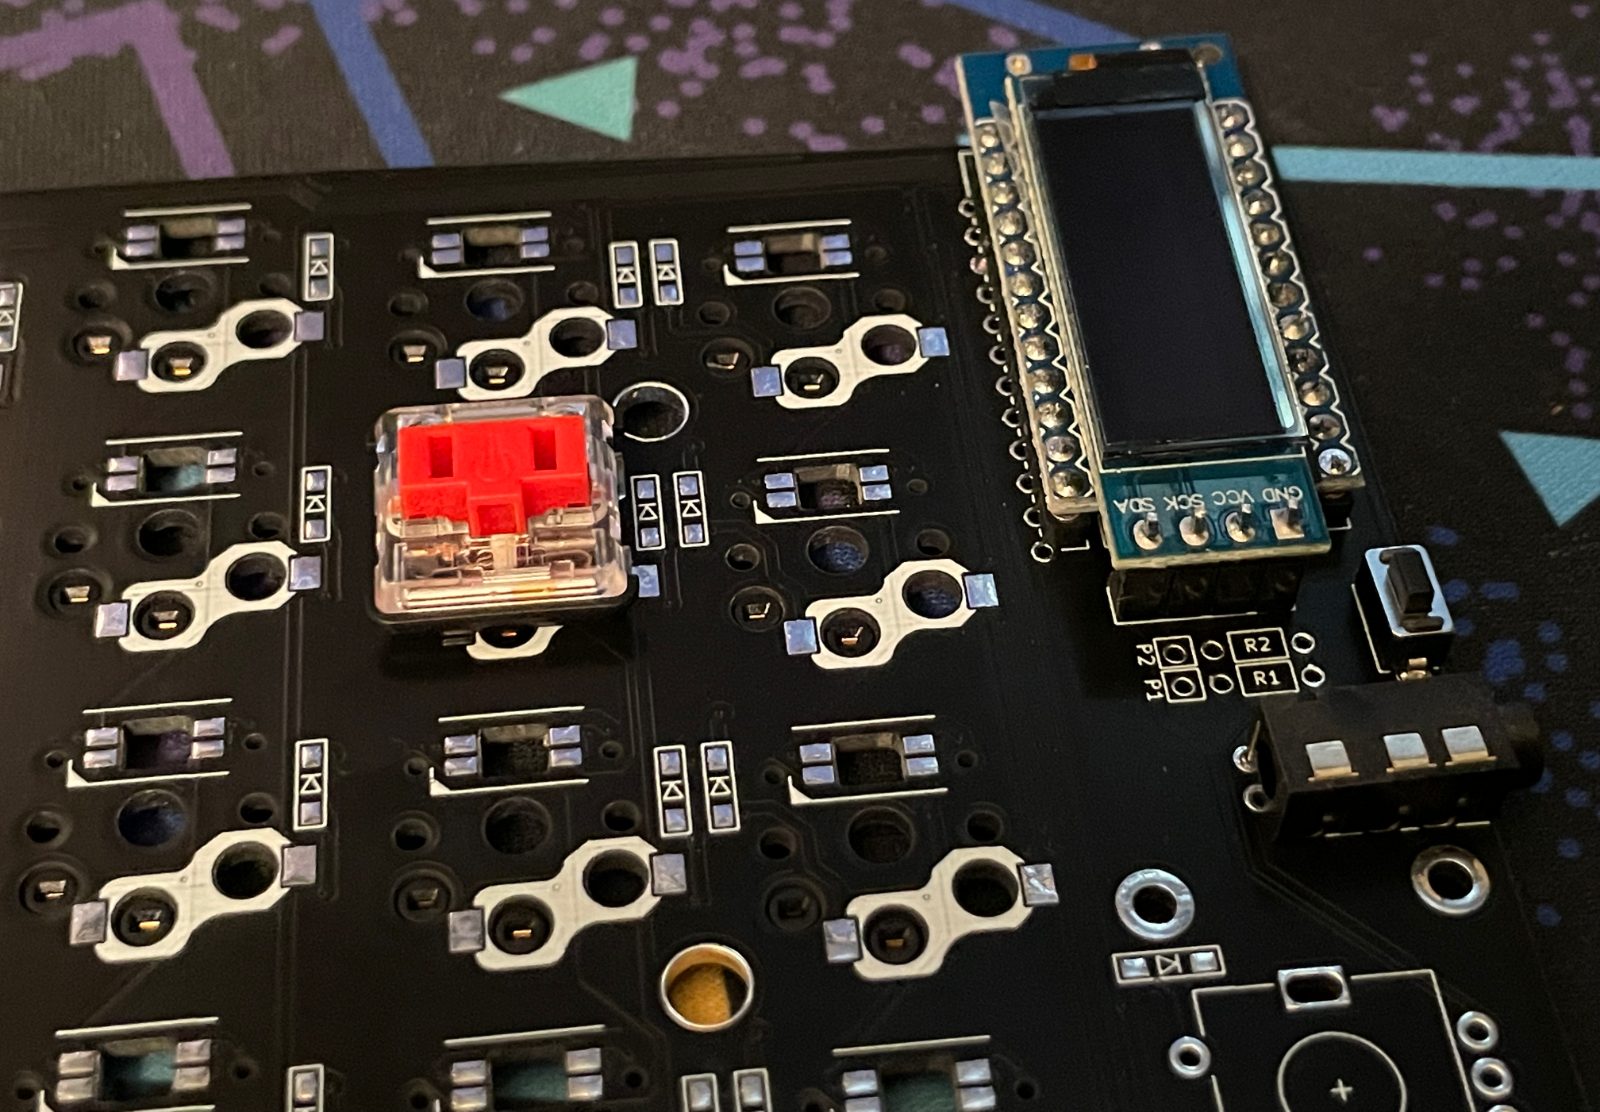
The first step of building the Sofle may be one of the more intimidating on paper. The Sofle leverages SMD surface mount diodes in its keyboard design. Most beginner soldering focuses on “through hole” components. As the name implies, these are components with long “legs” that you slide through metal holes on a PCB. You then fill the hole with solder, and a circuit connection is made. Surface mount components are a bit more fiddly to work with. They instead only rely on small metal “pads” resting on the top of a keyboard. You lay the component down and then apply solder to the pad to make sure the diode lays flat.

I had previously avoided SMD soldering. It’s more precise, more fiddly, and usually requires a more expensive soldering iron with good temperature control. The surface mount diodes on the Sofle didn’t give me too much trouble however. If you’re a competent through hole solderer and are turned off by the idea of SMD components, try not to worry about it too much. Just make sure you have a good pair of reverse-action tweezers. These bad boys stay clamped shut by default, and make it way easier to work with diodes the side of a grain of rice.
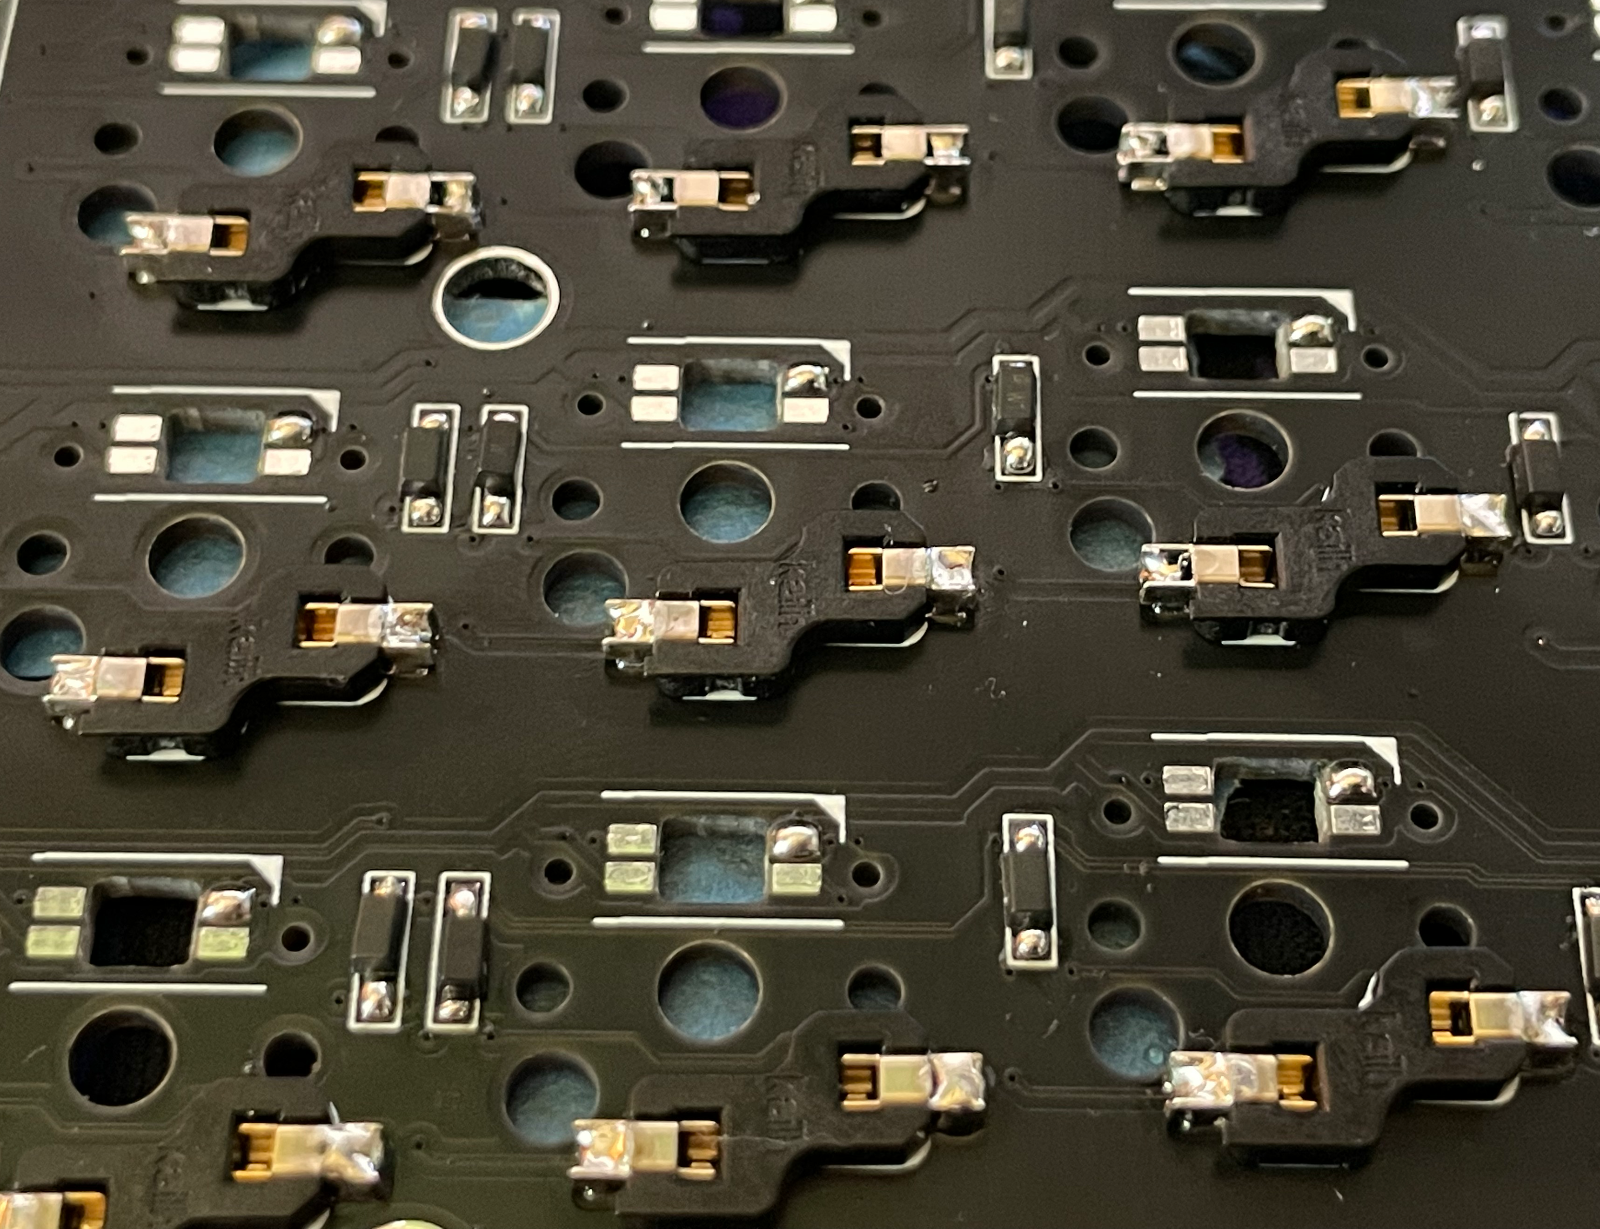
Next come the hotswap sockets. These are also technically surface mount, but the pads you solder them to are comically large. It’s honestly difficult to use too much solder here. The sockets deal with some amount of physical stress, so you can have a heavy hand with your solder and give them a bit extra support.
The last surface mount component is the per-key LED backlighting. These are also another beginner-friendly SMD soldering experience. The SK6812 Mini-E LEDs have long legs on them, and the board has small holes cut out for the light emitting part of the LEDs. It’s obvious when they’re seated correctly or when something isn't quite right and needs fixing.
Next comes the microcontrollers. The Sofle Choc is designed around the Arduino Pro Micro. This is a board which has been cloned numerous times. You can use any Pro Micro compatible board, such as the popular Elite-C microcontroller. The Elite-C and some more recently manufacturers Pro Micros have USB-C instead of Micro USB on them, so think about what type of connection you’d like to use for your keyboard before you buy the microcontroller.
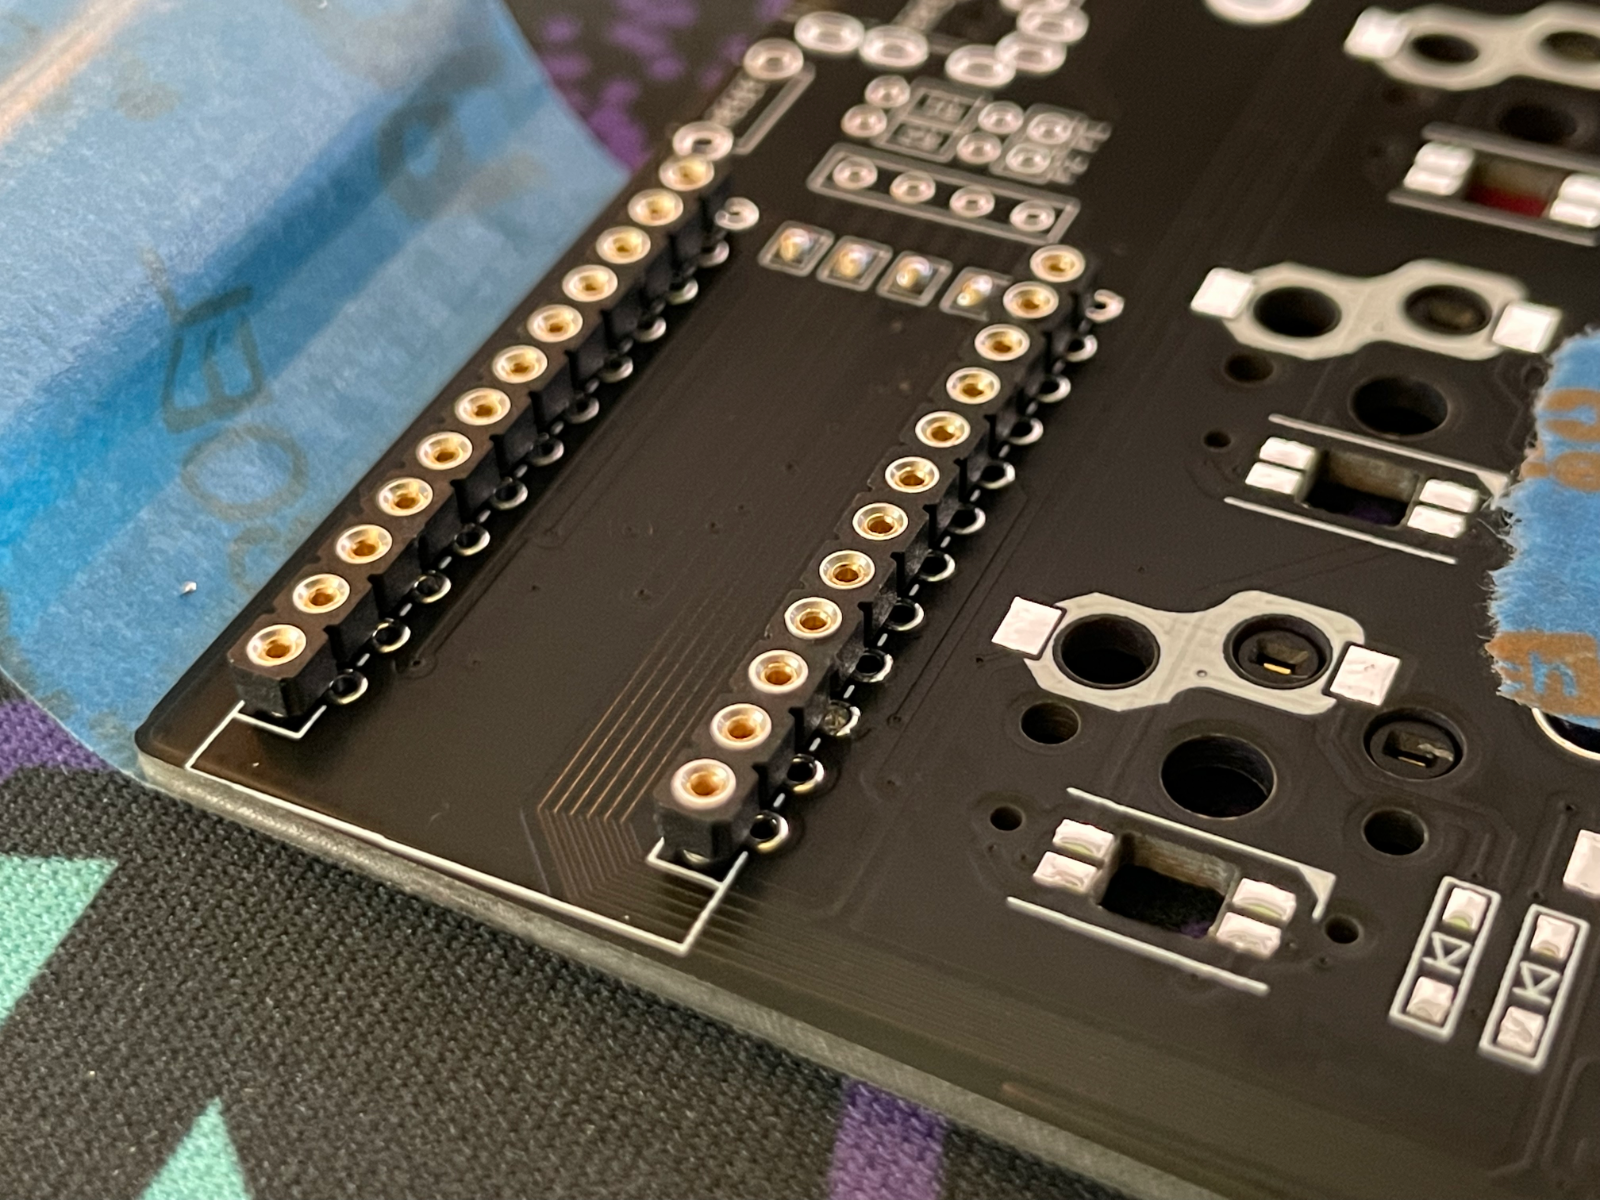
Microcontrollers can be soldered to the keyboard directly, but most people recommend “socketing” your controllers. This is a process of putting a female socket onto your keyboard itself, and a set of male pin headers onto the microcontroller. If something happens to your microcontroller and you need to replacer it, it’s much easier to remove a socketed controller and slot in a new one. Also, if you end up making more than one keyboard, you can move the relatively expensive microcontroller between boards instead of making redundant investments.
Brian once again has a good guide here. The community has standardized around “machine pin” headers due to their low height. When building a mechanical keyboard, just make sure you pay attention to the orientation of the microcontroller. The community typically mounts microcontrollers face down for aesthetic reasons, but the practice isn't universal. The OLED screens goes through a similar socketing process.
After that, you just need to solder a few simple through hole components. The reset switch, TRRS connector and encoders should all be pretty straightforward after all of those SMD components. Keeping a roll of blue painter’s tape around can help make sure the components continue to lay flat as you flip the board over.
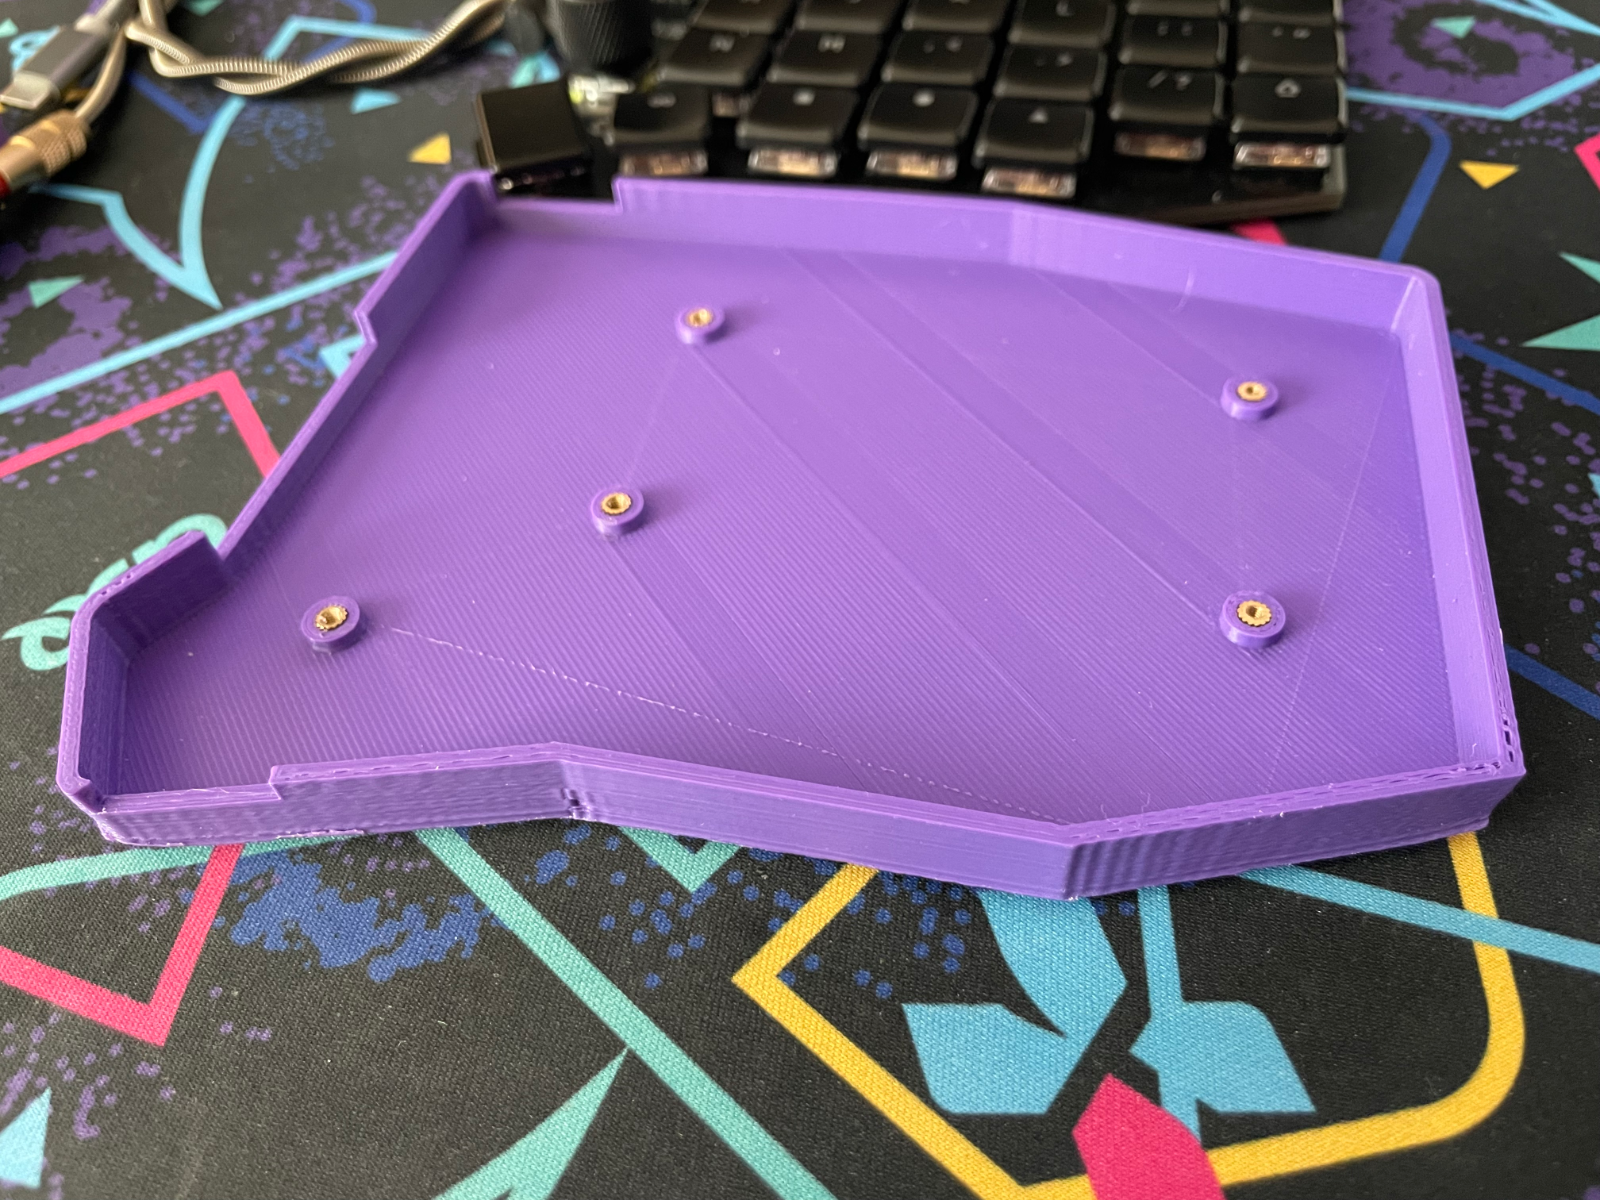
At this point you can start slotting in the key switches. The Sofle Choc comes with a switch plate to add a bit of stability to the board, but it doesn’t have a traditional case. Instead they just give you a few rubber feet to apply to the bottom of the PCB. It's a bit minimal, but the keyboard is attractive enough to stand out on its own. If you have a 3D printer however, there’s a few options at your disposal. Lytedev on Thingiverse created a nice low profile case for the Choc variant of the Sofle, and I’ve got a fork with support for threaded screw inserts.
The last step is to flash the keyboard firmware to the microcontrollers. This will either be trivial or daunting depending on your prior experience with Arduinos. QMK is well documented and is easy enough to get compiling locally, but thankfully several precompiled builds also exist for the Sofle. GUI tools like the QMK Toolbox help streamline the process of uploading new images to one’s board. You can even skip fiddling with QMK config files and use a VIA image if you’d like to leverage the community’s burgeoning graphical key remapping tool.
Using the Sofle Choc
Even for folks who haven't fallen down the mechanical keyboard rabbit hole, it's hard not to notice that keyboards are getting smaller. Companies like Apple are shipping their desktop iMac computers with tenkeyless keyboards, and mainstream manufacturers like Logitech have more than a few "75%" layout offerings at this point.
My old Quefrency took things one step further. It’s 65% design dropped the Function row and squished the arrow keys and most of the navigation keys up against the right side of the keyboard. Thankfully keycap vendors have started to offer smaller shift keys to make these layouts a bit less cumbersome to build than they were in the past.
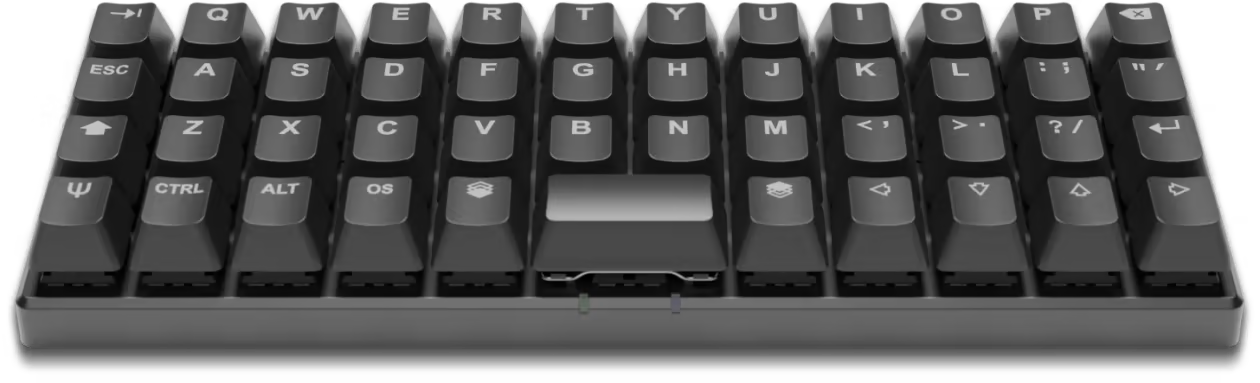
The next step always seemed like a doozy for me though. 60% boards like the Anne Pro or the Pok3r ditch the arrow keys entirely. The idea is that you hold down a laptop-style FN key in order to use the "superfluous" keys that their layouts dropped. Depending on the keyboard, your arrow keys would either become a WASD-style cluster over on IJKL, or they’d lean into an old school vi-style HJKL row.
It always looked like a cumbersome arrangement to me. Full disclosure, I’ve never owned one of these classic 60% keyboards, but if I was so nervous about 61-key layouts, how did I end up on a 58-key board?
Well, it all comes down to thumb keys and layers. On a classic small-scale keyboard designs, you’ll often need to hide certain keys behind an Fn key. If your laptop doesn’t have a Delete key for instance, you’ll need to rely on Fn+Backspace to achieve the same outcome. Most of the time these Fn keys are squished in with Ctrl, Alt, and Win / Cmd on one or both sides of the spacebar. (Update: It turns out the Pok3r lets you use Caps Lock as an Fn toggle, which does sound a bit more comfortable than the Fn key next to the left Alt.)
QMK-based ergo mech keyboards take this concept to the extreme. They’ll have multiple function keys. Rather than just referring to these keys as Fn1, Fn2, etc., QMK uses a "layers" metaphor. Keyboards can stack multiple layers of additional key functionality on top of the base layout depending on which Fn-style keys are being held down. The Sofle for instance has a "Symbol" layer, a "Navigation" layer, and an "Adjustments" layer. You get to these other key functions by holding down Fn-like keys that are usually referred to as Raise and Lower.
The documentation of QMK has the full details if you're interested, but suffice it to say, the Sofle has some well thought out ways of accessing the keys it has dropped. This was actually the impetus for the Sofle keyboard itself. Adamčík had tried using the popular 42-key Corne keyboard, and wanted a few more keys to make a more comfortable layout.
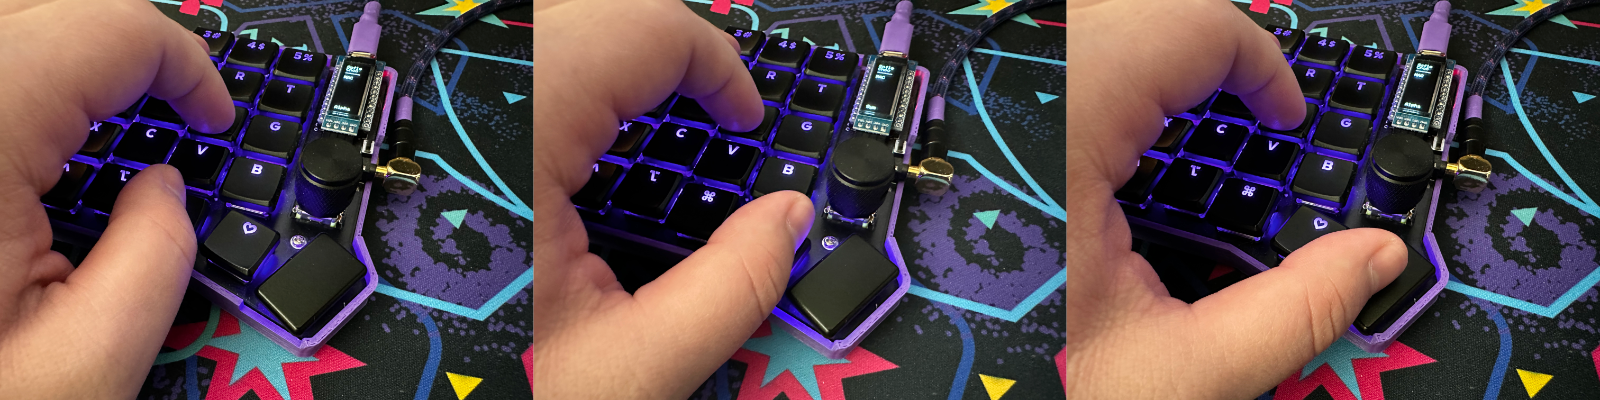
The Sofle puts the Raise and Lower layer keys where your thumbs naturally rest. Unlike a lot of laptop keyboards, you're not put in the awkward situation of remembering where they put the Fn key. It's not a clumsy, “Now did they put it between Alt and Win, or Win and Spacebar?” situation. They're just bam, right there, always under your left and right thumbs.
This basically solved my arrow key dilemma. The Sofle also uses IJKL for the arrow keys, but all you have to do to switch over to that mode is hold down the Raise key by your right thumb. Thanks to the keyboard’s column staggered layout, the arrows don’t even feel weird. The I and K keys are right on top of each other, so pressing "up" and" down" feels just as normal as a standard set of arrow keys. J and L are staggered slightly from the K key, but they're staggered in an equal amounts they still mirror each other. The act of moving around a document still feels familiar, you just have to adjust your "shift your right hand a few inches to the left before arrowing" muscle memory to "push your right thumb down before arrowing".
The switch took surprisingly little time to adjust to. If you’re interested in this style of split ergonomic keyboard but not quite ready to make the jump to an arrow-key free life however, you're not completely out of luck. The unusually asymmetrical Afternoon Breeze keyboard has a similar split ergonomic layout as the Sofle but it maintains a traditional navigation cluster. It doesn't have per-key RGB LEDs however, and in the end the light show won out. I’m happy with my choice, but the option’s still there if you’re on the fence.
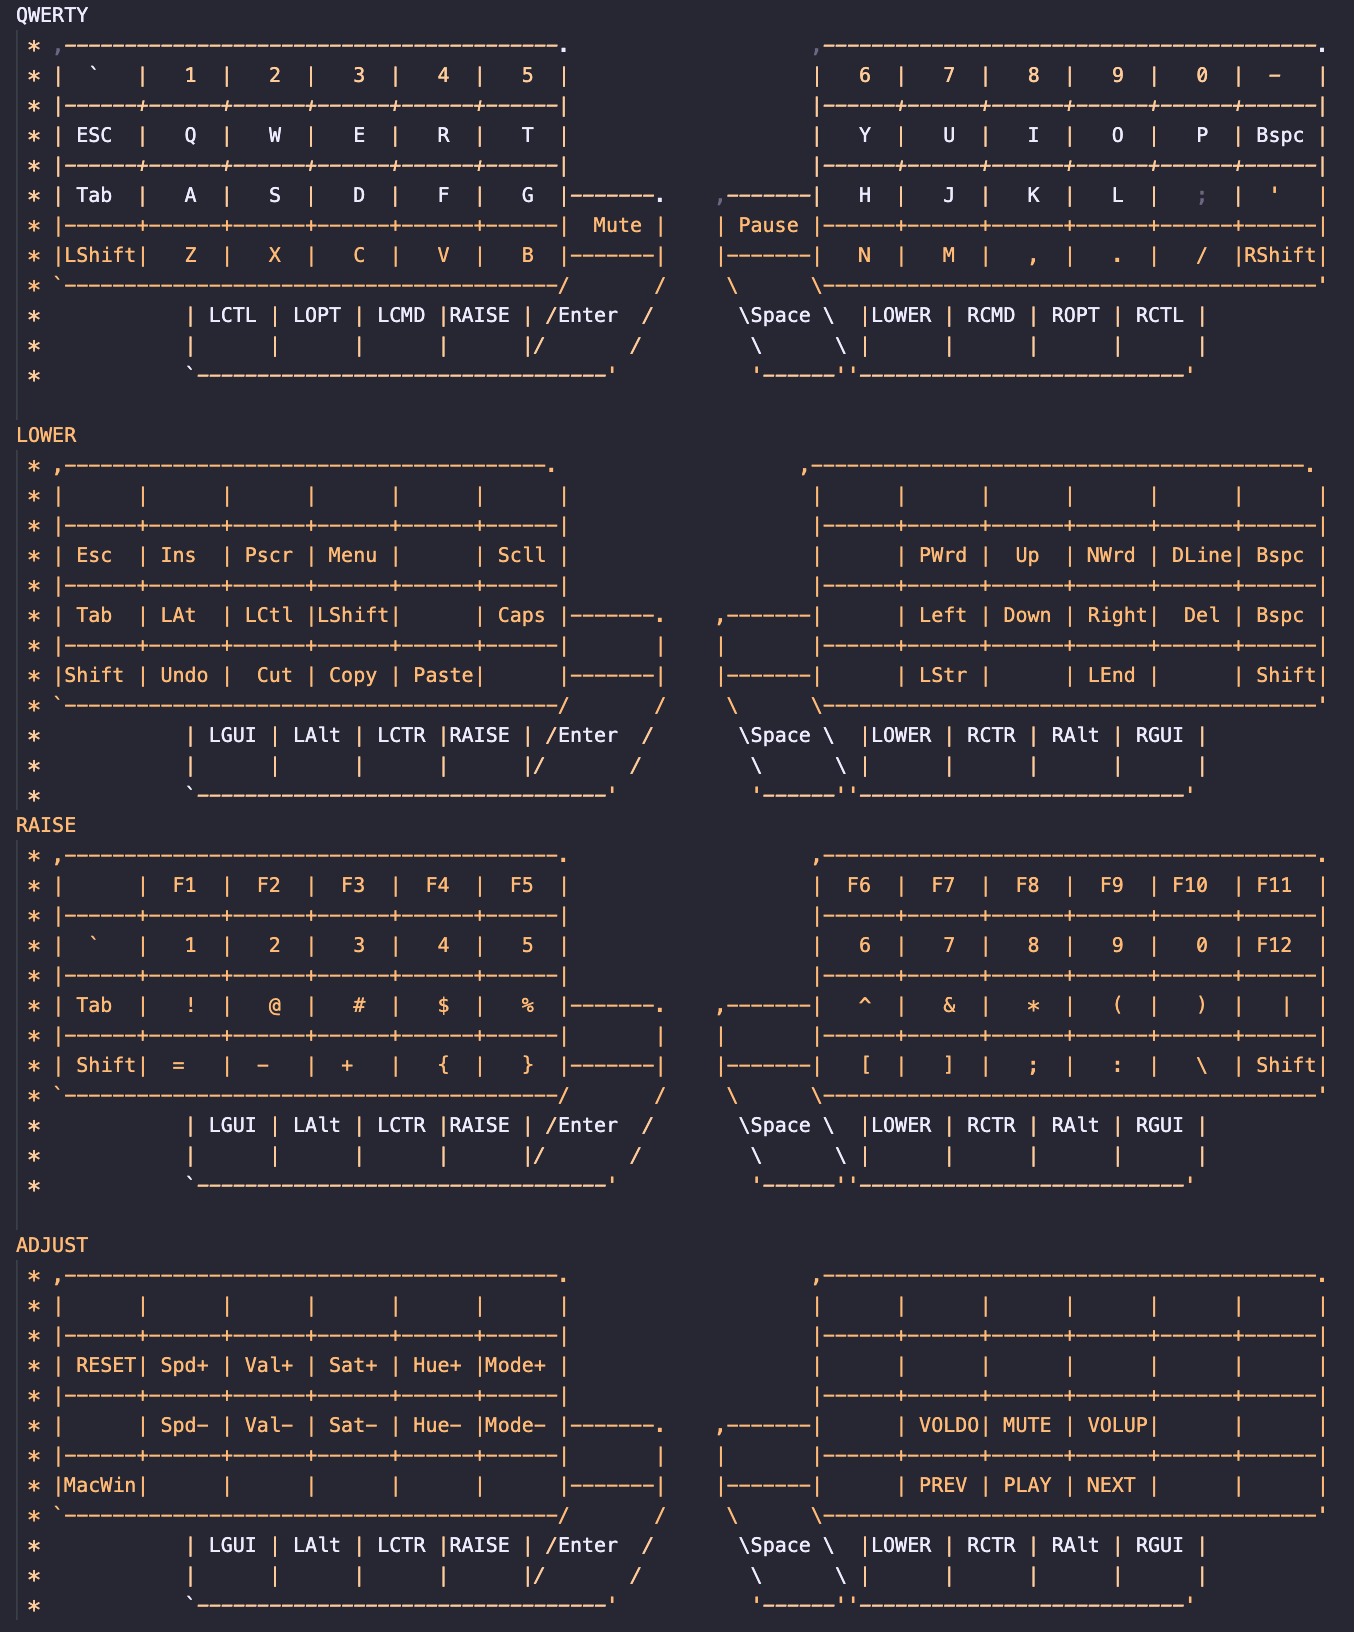
Using a layer for some extended symbols and brackets took a bit of getting used to. I never appreciated just how much - and _ come up in my day to day life. That particular key quickly got promoted to the one unclaimed slot next to my 0 key, but most of the other math symbols have taken some time to adjust to. I only do a moderate amount of Excel work in my life, but any time I fire it up I need to take a half-beat to remember that = is Lower+Z and + is Lower+C. Brackets like { } and [ ] somehow took me less time to adjust to. It’s kind of nice having them symmetrically positioned near one’s index fingers.
The biggest shift when moving to one of these column staggered or ortholinear keyboards is that they usually don't have a great place for the Enter key. The bracket keys and special symbols like \ usually get shuffled around on a symbol layer, but ' and " have too engrained of a muscle memory to get shunted off the pinky row. This means the Enter key needs to find a new home, and more often than not it ends up as either the right Shift key or one of the spacebar-style thumb keys.
I went with this later approach for my Sofle layout. My left thumb is Enter, and my right thumb is Spacebar. There was definitely a transition period, but I started to feel at home on the Sofle after a week or two of continued use. I had a few amusing moments on work screen shares where I needed to type a character I had lost track of, but those moments went away pretty quickly. Just be careful when typing in an IM window during the transition period. There were more than a few IM messages that were sent a little early thanks to the new Enter key position. Before I knew it though, the Sofle was just another keyboard to me.
The one interesting aspect I was curious about (and maybe a little worried to be honest) was how had it would be to transition back to a traditional row-staggered keyboard layout. I’m still going to be on my laptop some of the time, and thankfully the Sofle hasn’t ruined portable computers for me. There seems to be enough working space in my head to manage at least two keyboard layouts without too much trouble.
So Is It Ergonomic?
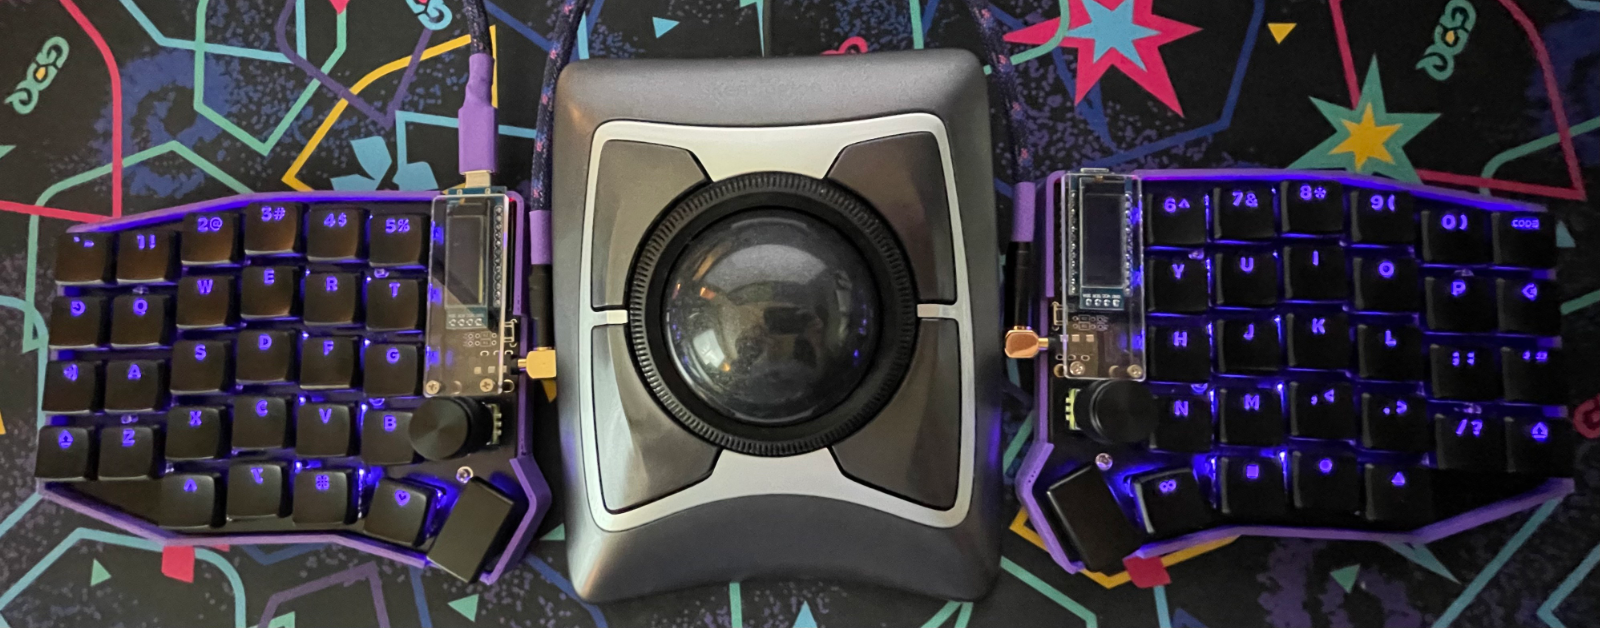
Probably? I’m not a doctor, but I haven’t had as much wrist trouble after a long typing session with the Sofle as my older Quefrency keyboard. Despite the Quefrency’s split design, I’d often end up just pushing the two halves together. That’s not really an option with the Sofle, so I naturally let them stay further apart.
I made the classic "changing two variables at once" mistake when looking to improve my desk situation. Around the same time I switched to the Sofle, I also bought a large Kensington Expert trackball. I feel like it probably made more of an impact when it came to sitting at my desk for hours a day, but everyone will have their own personal solutions when it comes to improving their ergonomics.
Also: Hey, sit up straight!
I ended up liking the Choc switches a lot more than I thought I would. Their low-travel nature ties out my hands a bit less than my heavy Zilent switches on the Quefrency. If you're looking to reduce the stress on your hands, you can get some astonishingly light switch options. I’m not sure I’d recommend immediately jumping on the 35g Red Pro switches to start with, but they’re a bit like typing on air once you get used to them. If they're not your cup of tea, no harm no foul. This keyboard's got hotswap sockets, remember?
Bells & Whistles
I’ve mentioned several times now that I specifically bought the Sofle Choc due to the keyboard's per-switch RGB LEDs. It’s the entire reason I went with this board, and they’re fine.
That's it. RGB LEDs are fine. There's some neat cycling rainbow patterns one can enable, but they mostly just look nice in pictures. QMK has support for some really engaging interactive effects, such as strobing the lights in time with your current WPM typing speed, but if you're a touch typist you're not going to be staring down at your keyboard while you type. The interactive patterns are a hoot, but they also generally leave your keyboard unlit when you're not typing. With a few months of hindsight now, I mostly just leave my Sofle with a solid purple backlighting that matches the trim of the case.
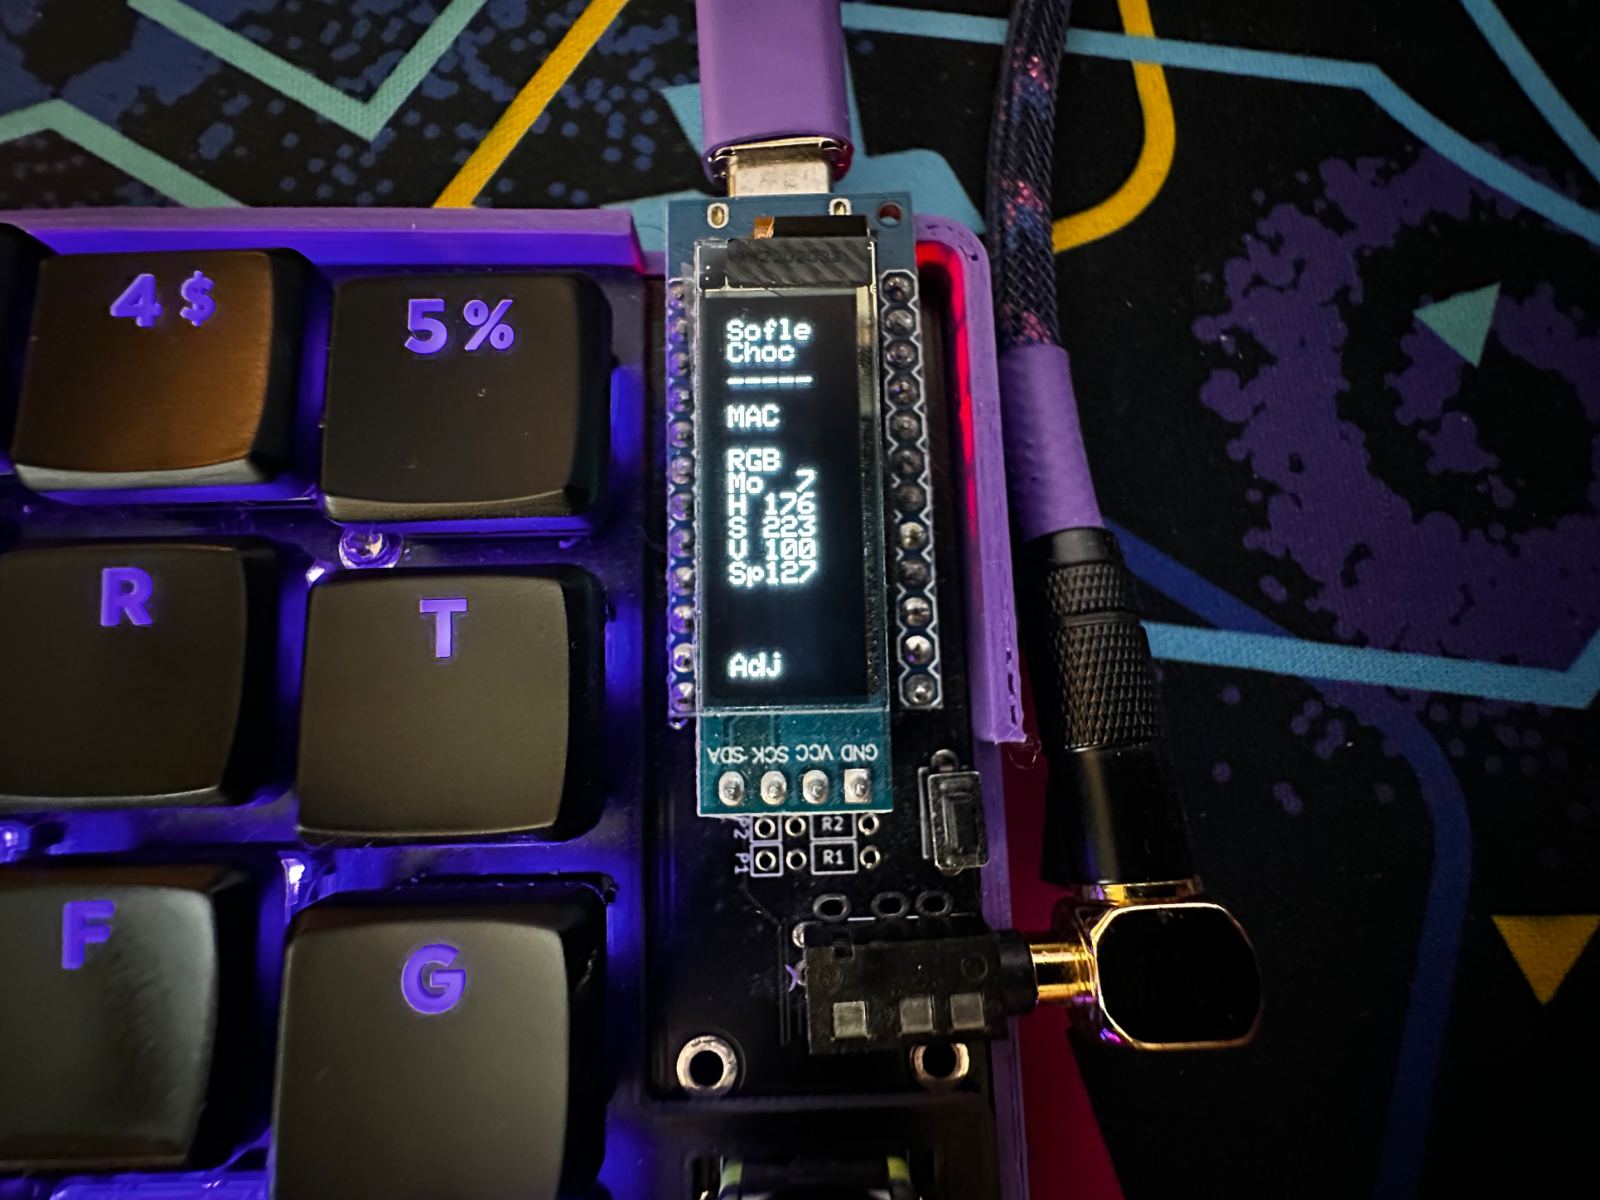
The OLED screens on the keyboard likewise look nice, but I haven’t taken the time to investigate them as much as I should have. You need to get pretty in the weeds of QMK in order to do the more impressive readouts, so right now it’s mostly a verification that the keyboard’s plugged in. I’ve got my board set up to toggle between Mac and Windows modifier layouts, so it’s also nice being able to see which OS my keyboard’s currently set to. It’s my own fault for not leveraging these fully, but again, this is a keyboard and you don’t tend to look down at it too much.
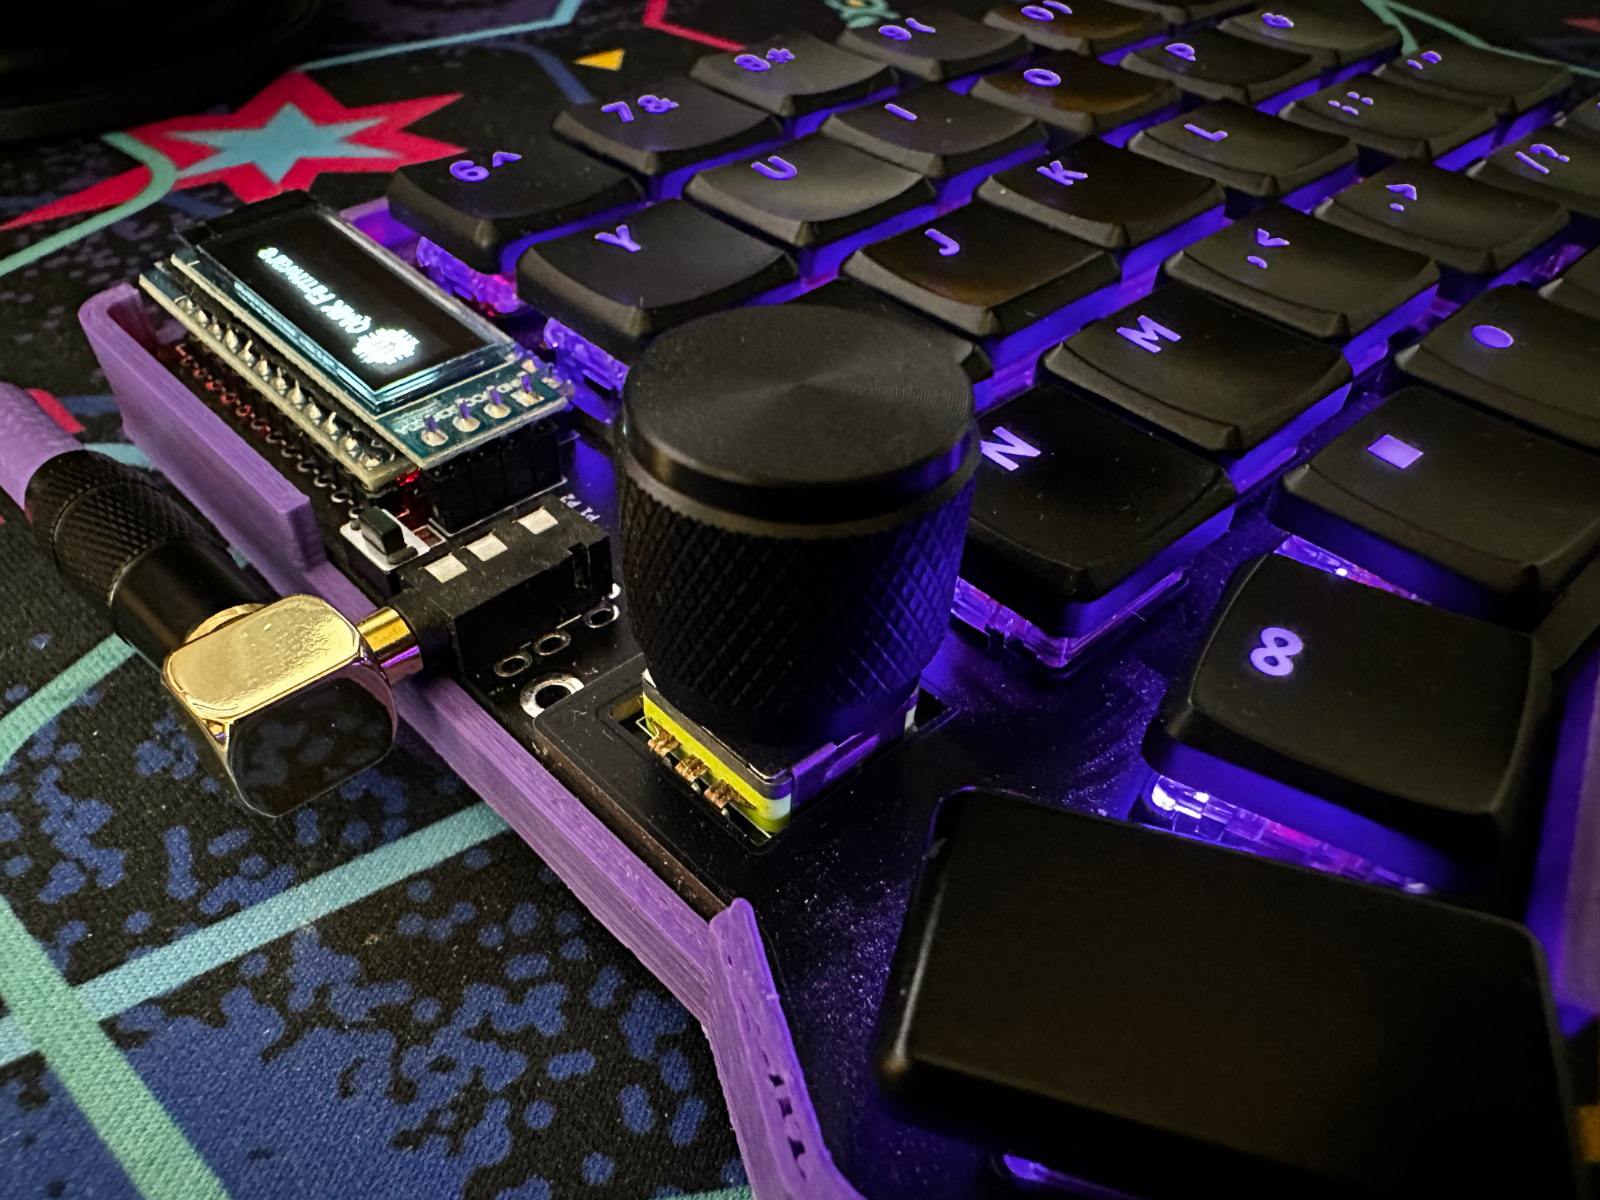
Finally there’s the rotary encoders. AKA the knobs. The knobs were a must when I bought the Quefrency, and I wanted to carry that over into the Sofle. They’re knobs! On a keyboard! Come on!
Okay, I have to admit, they only get a moderate amount of use. Since my Quefrency days, I've had my rotary encoders mapped to my system's volume and media keys. They work well for this use case, but it turns out that the Sofle's default keymap also has pretty good volume and media hotkeys. Raise + IJKL give you quick access to the keyboard's arrow keys, and Adamčík decided to put the volume controls on Raise + Lower + IJKL. If you hold both of your thumbs and push "left and right", you raise and lower the volume. Shift your fingers down one row, and surprise, there's your media controls.
The Sofle Choc was a pretty maximalist build, and it helped me figure out what my priorities are for future keyboards. Rotary encoders aren’t the must-have I was making them out to be, and RGB backlighting is once again a nice to have. The advanced functionality that has honestly seen the most amount of use is the basic QMK support. I've gone ahead and created a few different macros for things like switching devices on my KVM. It's hard to deny how nice the MBK Glow keycaps look with the purple backlighting, but I may save some money on future builds and skip the per-key LEDs if the keycap ecosystem expands their aesthetic options.
Conclusion
I guess I should have seen this coming, but I never pictured myself becoming a Weird Keyboard Person. My first mechanical keyboard build was mostly a way to pass the time researching and building something during the early days of Covid. I fully expected the Sofle to be way too much and eventually retreat retreat back to my Quefrency.
I've been pleasantly surprised however. The Sofle Choc is a great keyboard! It's a wonderful entry point into this crazy world of low-profile ergonomic mechanical keyboards. I’ve definitely gotten bit by the mechanical keyboard bug, and I’m already pondering what my next move may be. I still use a decent number of number keys and modifiers in my day to day work, but the ultra-minimal 42 and 38 key keyboards do have some attractive compactness to them. I’m not sure if I’m ready to make that jump just yet, but it’s certainly within the realm of possibility in the way that it wasn’t before. Maybe I'll research designing my own custom keyboard PCB.
I hope this was a useful writeup! There are a lot of “Intro to Mechanical Keyboard” guides out there, and plenty of hyper-enthusiast forum posts and Github readme.md files floating around, but I feel like it can often be tricky to transition from the former into the later. I enjoy writing these brain-dump "How did I get here?" pieces to try and connect those dots. Hopefully this gave you a few new terms to Google if nothing else.
The Sofle Choc can be purchased as a full kit from Brian Low. The PCB and other components can also be purchased piecemeal from MKUltra in the US and 42Keebs in the EU.